Saturday, April 25, 2020

鸡腿肉腊肠火腿片电饭煲仔饭 Rice Cooker Claypot Chicken, Chinese Sausage and Ham Rice


鸡腿肉腊肠火腿片电饭煲仔饭 Rice Cooker Claypot Chicken, Chinese Sausage and Ham Rice


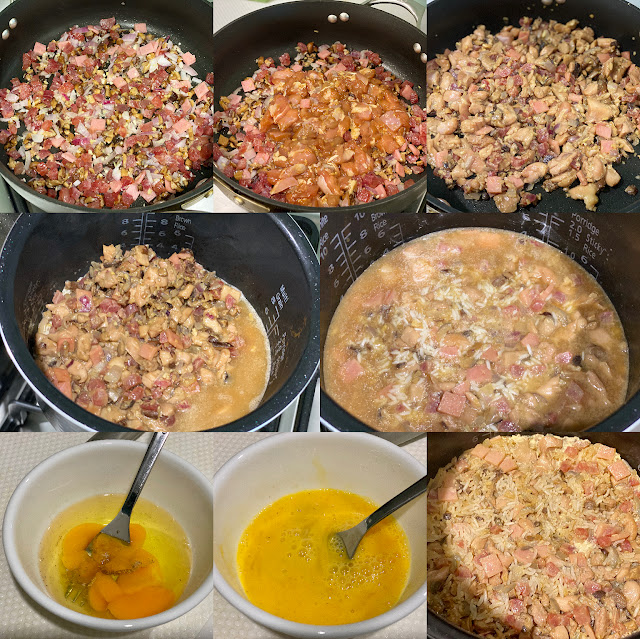
饭煮熟后,打入鸡蛋再焖上10分钟左右即可享用。
卖相一般,但是“口味”令人满意的电饭锅版的鸡饭!
改良版的电饭锅鸡饭,MCO(Movement Control Order)期间善用家里有的材料完成的family meal之一。天使们第一次品尝口味比较“重”的家庭餐,一直碎碎念好好吃哦。呵呵呵...

鸡腿肉腊肠火腿片电饭煲仔饭

{材料}鸡腿肉 2只(切柳状), 腊肠2条 (去皮后切片), 火腿片2片(切丁),香菇5朵 (浸水至软后切丝), 米两杯, 煮2杯米所需的水, 鸡蛋2粒(加入一点胡椒粉,酱油和芝麻油打散备用), 大葱半粒 (剁碎), 葱头2粒(剁碎), 蒜头瓣x 2(剁碎), 姜片x 5 (剁碎)。

{鸡腿肉腌料} 姜片x 2 (剁碎), 盐½茶匙, 糖½茶匙, 酱油1 大匙, 黑酱油1 茶匙, 蚝油1大匙, 绍兴酒1/2大匙, 麻油½茶匙, 胡椒粉与栗粉适量。

{煮饭用的调味料} 橄榄油1 大匙,姜片x 2 (剁碎) ,鸡高汤 1大匙,酱油 1 大匙, 黑酱油1/2大匙, 蚝油1/2大匙, 麻油1茶匙, 盐1茶匙, 糖1茶匙, 胡椒粉½茶匙

{做法}

1. 鸡腿肉加入腌料拌均并腌制至少两小时(隔夜最好)。

2. 烧热油, 爆香蒜葱碎, 姜碎与大葱碎, 加入香菇丝, 腌好的鸡腿肉,腊肠和火腿丁以大火略炒均后, 拿起备用. (鸡肉7-8分熟就好)。

3. 把米放入电饭锅里洗净后, 充分沥干水分, 调入橄榄油拌匀泡大约一小时; 量好水的份量后调入煮饭用其它调味料, 使用煮饭的设定开始煮至5-6分熟; 将炒好的鸡腿肉, 腊肠片,火腿丁,香菇丝和其他材料一同加入电子饭锅里继续煮至熟。

4. 鸡蛋在饭熟后, 打入电饭锅里边, 保温加热焖10分钟后即可享用了。

***如果喜欢, 可以以个人口味加入炸脆的咸鱼片,银鱼仔或撒上葱粒拌均后享用。

Rice Cooker Claypot Chicken, Chinese Sausage and Ham Rice

{Ingredients} Chicken thigh x 2pcs (deboned, cut into strips), chinese sausage x 2(use boil water to blanch it and sliced), ham x 2pcs (diced), mushroom x 5 (soaked and shredded), rice x 2 cups, water for cook 2 cups of rice, egg x 2(beaten with some sesame oil, soy sauce and pepper), Half onion (chopped), shallots x 2 (chopped), garlic cloves x 2 (chopped), ginger slices x 5 (chopped).

{Chicken Thigh’s Marinades Sauce} Ginger slices x 2 (chopped), salt x ½ tsp, sugar x ½ tsp, soy sauce x 1 tbsp, black soy sauce x 1 tsp, oyster sauce x 1 tbsp, shao xing wine x ½ tbsp, sesame oil x ½ tsp, some pepper and corn flour.

{Rice cooking seasonings} Olive oil x 1 tbsp, ginger slices x 2 (chopped), chicken stock x 1 tbsp, soy sauce x 1 tbsp, black soy sauce x ½ tbsp, oyster sauce x ½ tbsp, sesame oil x 1 tsp, salt x 1 tsp, sugar x 1 tsp, pepper x ½ tsp.

{Method}

1. Marinate chicken with marinades sauce for at least twohours (If possible, overnight is better).

2. Heat up oil to saute chopped garlic, shallot, ginger and onion till fragrant, add in mushrooms, marinated chicken thigh, sausage and diced ham to continue stir fry under high heat until mix well. Set aside.

3. Wash rice and drains dry, add in olive oil and mix it well to soak for 1 hour; measure the right amount of water that use to cook rice and add in other seasonings that use for cook rice, start cooked with rice cooker until 50-60%, follow by add in “method 2 “ingredients and continue to cook until cooked.

4. Lastly add in egg and keep warm for about 10 minutes, and serve hot.

*** If you like, can add deep fried salted fish, anchovy or spring onions cubes according to personal taste to mix well and serve.

Previous: 干贝香菇枸杞萝卜粥 Dried Scallop Mushroom Congee

Saturday, April 18, 2020

干贝香菇枸杞萝卜粥 Dried Scallop Mushroom Congee
干贝香菇枸杞萝卜粥 Dried Scallop Mushroom Congee
材料准备中,小帮手来帮忙,她说要帮我快点煮好,这样妈咪就可以陪我啦。
粥就是很暖胃,也让忙碌的煮妇挤出一些时间陪陪天使们!

干贝香菇枸杞萝卜粥

{材料} 白米1杯, 小米 ½ 杯, 香菇5朵(泡软切丝),红萝卜1条(去皮切丁),猪肉丝适量(用一点酱油,胡椒粉和芝麻油腌5分钟),枸杞适量(洗净),干贝粒适量(洗净),去皮姜块适量。

{调味料} 清水12杯,鲍鱼汁1茶匙,橄榄油1茶匙和盐少许即可。

{做法}

1. 全部材料准备好后,全部放入高压锅中和调味料搅拌均匀,按下煮粥/汤键即可。

Dried Scallop Mushroom Congee

{Ingredients} White rice x 1 cup, millet x ½ cup, mushroom x 5 (soaked till tender, shredded), carrots x 1 (peeled and diced), some shredded porks (marinades with some soy sauce, pepper and sesame oil for 5 mins), goji berries(washed), some dried scallops(washed), some ginger slices(peeled).

{Seasonings} Water x 12 cups, abalone sauce x 1 tsp , oloive oil x 1 tsp and some salt.

{Directions}

1. Get ready all the ingredients, put into pressure cooker to mix well with seasonings, follow by press “porridge/soup” button to cook.

Previous: 玉米杂蔬排骨鸡骨汤 Corn Mixed Veggies Soup

Sunday, April 12, 2020

玉米杂蔬排骨鸡骨汤 Corn Mixed Veggies Soup

玉米杂蔬排骨鸡骨汤 Corn Mixed Veggies Soup
材料备齐,加适量的水就可按键开始煲汤啦!

虽说煮妇天天都WFH(Work From Home),但煮到想偷一下懒时,一锅汤永远都是不错的stay at home家庭味哟,爱搭配什么就吃什么吧。没什么“坎”是过不去的,更何况是全球人类都得承担的生存之"坎"...男女人们啊,一起加油吧!

玉米杂蔬排骨鸡骨汤

{材料} 玉米两条(洗净切块状),番茄2粒(洗净,热水川烫去皮切块状),胡萝卜2条(洗净去皮切块状), 红枣5粒(洗净去核),排骨1条(切块状),鸡腿骨5块。

{调味料} 盐和和清水适量。

{做法}

1. 把全部材料准备好后放入锅内,加入适量的清水。

2. 然后,按下高压锅的“煲汤“功能,煮好后再放盐即可享用。

Corn Mixed Veggies Soup

{Ingredients} Corn x 2 (clean washed and cut into bite sized), tomatoes x 2 (clean washed, blanch over boiling water to peel off the skin and cut into bite sized), carrots x 2 (clean washed, peeled and cut into diced), red dates x 5 (clean washed and seeded), some pork ribs and chicken thigh bone x 5.

{Seasonings} Some salt and water.

{Directions}

1. Put all the ingredients into the pressure cooker and add in right amount of water and rock sugar.

2. Then, press “soup” button on pressure cooker to cook it, served hot with a pinch of salt or according to personal preference.

Previous:番薯馅包子 Steamed Sweet Potato Bun

Friday, April 3, 2020

番薯馅包子 Steamed Sweet Potato Bun


番薯馅包子 Steamed Sweet Potato Bun
先把番薯切小块状蒸熟,要揉面用的,用搅拌机1打成泥状。
要拿来做包子馅料的,压成泥状,加入牛油炒到水份开始收干即可,待凉备用。
面团发酵大约一小时左右后,杆平排气,卷起后切成想要的份量。
两个热心的小帮手上线,不能说她们拖后腿,就只能承认“我们”都在学习的阶段,哈哈哈!
我的完成品比我想象中的好很多,她们做的嘛外型创意十足而且都能吃的哦!
口感松软且馅料很足的番薯包子!
包子,妈咪又要做包子啦...我们可以玩"真正"的play-doh啦...OH MY GOD😨🤦🏻‍♀️,自从容许她们加入后,每次不管是任何烘焙活动在她们醒着的期间,她们都会瞄准我的面团或任何能够玩的都自行拿来玩,没被她们闹烦时大多还能按住脾气不发火一起完成“任务”,呵呵!

番薯馅包子

{材料} 面粉400克,熟番薯泥200克(用搅拌机打成泥状),干酵母5克,糖20克,油(玉米油或其它植物)10克,水200克左右。

{番薯馅料}熟番薯泥200-250克左右(用按压方式压成粗泥状),无盐牛油25-30克。

{做法}

1. 番薯馅料先炒至水份稍微收干即可,待凉备用。

2. 全部材料混合均匀揉至光滑面团(用搅拌机大约15分钟。)

3. 盖上湿布让面团发酵至两倍大(大约50-60分钟左右。),按下去不会回弹即是发酵好了。

4. 将发酵好了的面团搓成长条状,分成合适的份量,休面十分钟左右再搓成小圆团,包入番薯馅料,封口朝下放入已经铺上一层防油纸的蒸锅中。

5. 然后,蒸锅蒸12分钟左右即可。趁热享用或待凉后速冻,速冻请在1-2个月内吃完最好。
***速冻馒头无需解冻,要吃时再次用蒸锅蒸10分钟即可享用!

Steamed Sweet Potato Bun

{Ingredients} Flour x 400g, sweet potato puree x 200g (use blender to puree steamed sweet potato), instant yeast x 5g, sugar x 20g, oil (corn oil or other vegetable’s oil) x 10g, water x 200g.

{Filling Ingredients} Steamed sweet potato puree x 200-250g(press the steamed diced sweet potato till desired smooth texture.), unsalted butter x 25-30g.

{Directions}

1. Prepare the filling 1st by stir-fry the sweet potato puree with unsalted butter till slightly thickening, set aside.

2. Mix all ingredients well in a mixing bowl, knead the dough until it able to form a smooth ball shape.(About 15 mins).

3. Cover with a wet cloth and let it be prove until double the size. (take about 50-60mins.)

4. Divide, flatten, roll out the dough, put the filling in the centre, and ready to shape according to personal preference.

5. Place the shaped dough on the steamer that layer with greaseproof paper to steam for about 12 mins. Serve hot or let it be cool and frozen it asap to keep for consume within 1-2 month.
***Frozen bun do not need to thaw, only need to re-steam for 10 mins when want to consume!)

Previous: 爱心牛油饼干 Heart Shape Butter Cookies

Wednesday, April 1, 2020

爱心牛油饼干 Heart Shape Butter Cookies

爱心牛油饼干 Heart Shape Butter Cookies
准备烘烤和烘烤中...
这非常时期,可以烘焙的机率提高了一些,加上有了两位热心的小帮手,烘焙之路虽然比之前更“累”了但内心是满满的happy。有人陪在身边真的真的真的超幸福的,更何况能一起做着自己很热爱的活动之一。幸福可以很简单!

爱心牛油饼干

{材料}无盐黄油200克 , 糖粉50克,柠檬汁1汤匙,低筋面粉200克(或者面粉150克+玉米淀粉50克)。

{做法}
1. 将黄油和糖粉用搅拌器打发成乳白色后加入柠檬汁拌均。

2. 分两次加入粉料,搅拌均匀后装入挤花容器挤在铺了烘培纸的烤盘上,每块饼干之间得留点舒适的距离。

3. 预热烤箱160°C, 烤20-25分钟左右。(烤箱温度得自行拿捏哦!)烤好待凉后(15分钟左右)马上装入密封罐里保鲜,保酥和保脆。

***饼干面团在加入粉料拌均匀后冷藏30分钟更容易做造型哦。

Heart Shape Butter Cookies

{Ingredients} Unsalted butter x 200g, icing sugar x 50g, lemon juice x 1 tbsp, low-gluten flour x 200g(Or flour 150g + corn starch x 50g).

{Directions}

1. Mix butter and icing sugar in mixer bowl till fluffy, follow by add in lemon juice to continue mix them well.

2. Then, add in the flour to mix well, shape in baking tray that lined with cookies sheet, spacing them with comfort distance.

3. Preheat oven 160°C, baked for 20-25 mins. (Oven temperature adjust accordingly.) Let the cookies cool completely before stored in air-tight container.

***chill dough for 30 mins for easy shaping.

Previous:山药蘑菇双蔬干贝粥 Congee with chinese yam, mushroom, vegetables and dried scallop

Featured Post

余生,接纳和相信自己

过去的一年,依然充满了忙碌和挑战。我记得,忙才是生活该有的状态🤭。无论经历了怎样的风雨,很庆幸自己始终坚持了下来。回顾这一年的付出和成就,尽管依旧总有并不完美的那一面,但都是真实的自己。 我们常常追求完美,渴望获得认可,却也因此忘记了如何接纳自己。 每当夜深人静时,那些心底的疲...