Sunday, June 21, 2020

酥皮吞拿鱼角 Mayonnaise Tuna Puff Pastry


酥皮吞拿鱼角 Mayonnaise Tuna Puff Pastry
基本材料
超快手的下午茶。
天使们的味蕾总是轻易地被这puff pastry 吸引住了,也许“婆妈”不鼓励她们吃太多这类对她们这年纪不易消化的食物,久久才能吃一次的她们总是吃得很「心满意足」。

酥皮吞拿鱼角

{材料} Kawan牌子的酥皮5片(室温解冻10-15分钟左右即可用),mayonnaise tuna1罐,鸡蛋1粒(打散,抹表面用的。)

{做法}

1. 烤盘铺上烘焙油纸,把酥皮排好,放入适量的mayonnaise tuna。

2. 将酥皮对折,用叉子把酥皮边边按压紧。

3. 然后,酥皮表面抹上蛋液。

4. 预热烤箱200°C, 烤15-20分钟左右或至表面金黄色即可。(烤箱温度得自行拿捏哦!)

Mayonnaise Tuna Puff Pastry

{Ingredients} Puff pastry x 5 sheets (thaw at room temperature for 10-15 mins or until the dough is soft), mayonnaise tuna x 1 can, egg x 1 (beaten, for egg wash)

{Directions}
1. Place a non-stick baking paper on the baking tray, arrange the puff pastry sheet well in distance, scoop in some mayonnaise tuna.

2. Fold the puff pastry, use fork to seal the sides.

3. Then, egg wash the puff pastry’s top.

4. Preheat oven 200°C, baked for 15-20 mins or until golden brown. (Oven temperature adjust accordingly.)

Previous: 双色紫薯馒头 Steamed Purple Sweet Potatoes Bun

Saturday, June 20, 2020

双色紫薯馒头 Steamed Purple Sweet Potatoes Bun

双色紫薯馒头 Steamed Purple Sweet Potatoes Bun
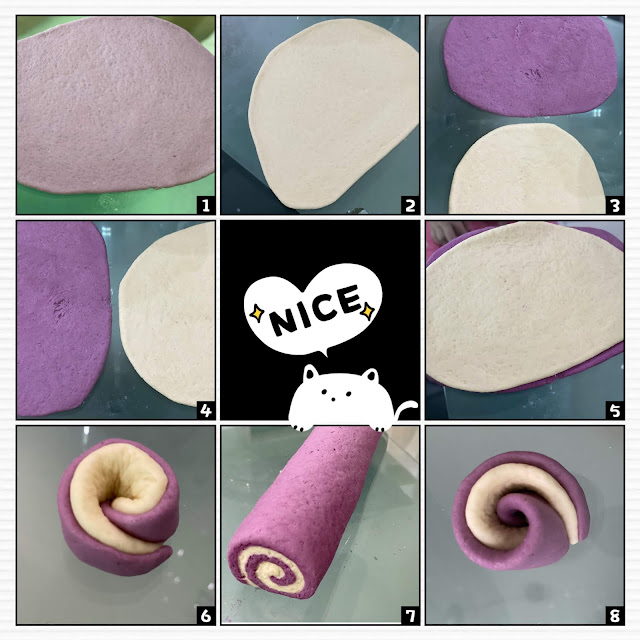
先准备好紫薯面团。
再准备白色普通面团。
看似容易但要学得精还是有待加强...
小帮手们很努力捏捏捏捏捏,我就偷懒擀了几下就收工卷起,手不太能使力。
蒸好外型不至于太“难看”,口感也OK。
看着😍的紫,总是特别疗愈!
网购了大约900克的紫薯,少不了拿来做馒头,这次的双色馒头有点“偷懒”,发酵好了后,因为手(受点伤)无法使出太多力而省略了揉面团的时间,所以馒头表面没预期中的滑面。

双色紫薯馒头

{材料} 面粉400克(分成两份,每份各200克),熟紫薯泥100克(加点水用搅拌机打成泥状),干酵母4克(分成两份,每份各2克),糖30克,油(玉米油或其它植物)8克,水90-100克。

{做法}

1. 紫薯泥微凉后加入2克的酵母粉,加拌均匀再倒入200克面粉,用搅拌机或手揉成光滑面团。

2. 另外一份200克面粉,加入2克酵母,糖,水和玉米油用搅拌机揉成面团。

3. 两份面团都盖上湿布让面团发酵成双倍大(大约45-60分钟),按下去不会回弹即是发酵好了。

4. 将发酵好了的两份面团各擀一擀(有能力就充分的揉搓均匀5-10分钟后再擀),擀成面片状后将两份面片叠合再擀一擀卷成长条状。分成合适的份量,放入已经铺上一层防油纸的蒸锅中休面十分钟左右。

5. 然后,蒸锅蒸12-15分钟左右即可。

Steamed Purple Sweet Potatoes Bun

{Ingredients} Flour x 400g (divide to 2 portion, each x 200g), sweet potato puree x 100g (use blender to puree steamed sweet potato), instant yeast x 4g(divide to 2 portion, each x 2g), sugar x 30g, oil (corn oil or other vegetable’s oil) x 8g, water x 90-100g.

{Directions}

1. Add 2g of yeast into the sweet potato puree to mix well only add in the flour, mix them well in a mixing bowl, set aside.

2. Another portion of 200g flour, add in 2g of yeast, follow by the sugar, oil and water to mix them well in a mixing bowl, knead the dough until it able to form a smooth ball shape.(About 15 mins).

3. Both doughs cover with wet cloth and let it be prove until double it’s size. (take about 45-60mins.)

4. Stretching and flattening the dough, follow by overlapping them to roll up as a dual-coloured long strip shape, divide into the desired portions.

5. Place the shaped dough on the steamer that layer with greaseproof paper to steam for about 12 mins.

Previous: 面包布丁 Bread Pudding

Saturday, June 13, 2020

面包布丁 Bread Pudding

面包布丁 Bread Pudding
基本材料简单,做法也很easy!
暖心小帮手又上线啦...
筛过的牛奶蛋液面糊,才倒入装好面包块和核桃碎的烤盘中。
待稍微凉后,趁温热享用最好吃!
奶味挺重的下午茶,她们最爱,我就还好而已咯😄
关于这面包布丁的小记忆:她们的第一印象是去旅游时酒店早餐有的一种,她们可爱极它了,那时入住一周只要有这布丁必拿,呵呵!对于婆妈简易版的做法,她们一样那么捧场😄

面包布丁

{材料} 面包4片(剪成四方块状),鸡蛋两粒,面粉1汤匙,糖一茶匙,牛奶250-300毫升,盐少许,核桃碎和黑芝麻适量。

{做法}

1. 烤盘抹上少许牛油,放入面包块状,再撒进核桃碎。

2. 将鸡蛋液,糖,盐和牛奶搅拌均匀,再加入筛过的面粉继续拌均至无颗粒状即可。

3. 筛过蛋奶面糊,倒入装着面包块和核桃碎的烤盘中,撒上黑芝麻。

4. 预热烤箱170°C, 烤25-30分钟左右。(烤箱温度得自行拿捏哦!)


Bread Pudding

{Ingredients} Bread x 4 slices (cut into bite-size pieces), eggs x 2, all purpose flour x 1 tbsp, brown sugar x 1 tsp, milk 250-300ml, a pinch of salt, some chopped walnut and black sesame.

{Directions}

1. Greasing baking pan with some unsalted butter, put in the bread slices and chopped walnuts.

2. Mix the egg, sugar, salt and milk till well combine, follow by add in sifted flour to stir till have smooth mixture.

3. Sifted mixture, follow by pour over the mixture to the baking pan with bread pieces, sprinkle up some black sesame.

4. Preheat oven 170°C, baked for 25-30 mins. (Oven temperature adjust accordingly.)

Previous:红萝卜柠檬核桃蜂蜜小蛋糕 Honey Lemon Carrot Walnut Cupcake

Friday, June 12, 2020

红萝卜柠檬核桃蜂蜜小蛋糕 Honey Lemon Carrot Walnut Cupcake

红萝卜柠檬核桃蜂蜜小蛋糕 Honey Lemon Carrot Walnut Cupcake
萝卜碎,柠檬皮碎和核桃碎花点时间,其它材料就easy!
简单的拌均匀蛋黄糊即可备用。
蛋白滴几滴柠檬汁打发即可(拉起来有可以定住的小尖头即可。)

心形模具牛油涂不够,粘住啦,结果❤️造型不成功啦,讨厌!
烤出来后,柠檬香气扑鼻哟,果然如天使们的故事书写的那般没什么红萝卜味耶!
就是这本书,天使们期盼已久的蛋糕食谱终于被婆妈认真看待了...有稍微修改一下来迎合自家口味。
虽然没有口头上随便答应天使们一定会做这类蛋糕给她们,只是她们的耐心用在“这类”的机率高到不行,三不五时一定在晚上陪读时间拿出这本书,然后👭特地的提醒“婆妈”---我们很想吃这蛋糕耶,还会追问完全没有红萝卜味的蛋糕是怎样的嘞?!天使们:“妈咪有空我们一起做看看,好吗?”...终于身为“婆妈”的我在大半年后的某一天竟然被说服了,而且还真的隔天就下定决心给做出来完成她们持续了大半年“不厌其烦”地提醒,哈哈哈😂

红萝卜柠檬核桃蜂蜜小蛋糕

{材料} 红萝卜1条(洗净去皮,切丝切碎),鸡蛋3粒,红糖50克,柠檬皮碎2茶匙,核桃碎50克,柠檬汁2汤匙,蜂蜜20克,盐少许,低筋面粉90克(没用就用普通面粉72克:玉米淀粉18克),发粉1茶匙。

{做法}

1. 把蛋黄和蛋白分开,备用。

2. 将蛋黄和红糖混合均匀,分批加入红萝卜碎,柠檬皮,核桃碎,柠檬汁,蜂蜜和盐,搅拌均匀。

3. 发粉加入低筋面粉中,筛过再加入做法2搅拌均匀。

4. 蛋白加入几滴柠檬汁打发,(拉起有能定型的小尖头即可)然后慢慢地加入做法3的蛋糕糊,搅拌均匀倒入杯子蛋糕模具待烤。(不能用画圈的方式搅拌均匀哦!)

5. 预热烤箱170°C, 烤25分钟左右。(烤箱温度得自行拿捏哦!)

***预热烤箱前先在烤箱底层倒入200毫升的清水,预防蛋糕表面裂开。

Honey Lemon Carrot Walnut Cupcake

{Ingredients} Carrot x 1pcs (washed and peeled, shredded and fine chopped), eggs x 3, brown sugar x 50g, fine chopped lemon zest x 2 tsp, fine chopped walnut x 50g, lemon juices x 2 tbsp, honey x 20g, some salt, cake flour x 90g (If don’t have can use all purpose flour x 72g: corn starch x 18g), baking powder x 1 tsp.

{Directions}

1. Separate egg yolk and egg white, set aside.

2. Mix the egg yolk with brown sugar, follow by add in chopped carrot, lemon zest, walnut, lemon juices, honey and salt, mix till well combined.

3. Add the baking powder into the cake flour, sift in "Directions 2" batter and mix until the flour is fully dissolve. (Do Not over mix!)

4. Add in few drops of lemon juice in egg white and whisk till form soft stiff peaks, then slowly add in "Direction 3" batter to mix them well only pour the batter to cupcake’s mould.

5. Preheat oven 170°C, baked for 25 mins. (Oven temperature adjust accordingly.)

***Before preheat the oven, pour in 200ml water at the bottom of oven, to have a better or nice cake surface.

Previous: 牛油蜜糖松饼 Honey Butter Biscuits

Saturday, June 6, 2020

牛油蜜糖松饼 Honey Butter Biscuits

牛油蜜糖松饼 Honey Butter Biscuits
基本材料算简单(家里有的就是easy,哈哈哈哈)


全程用手捏🤏,好久没这样“玩乐”啦...烘焙乐😄

很像烧包或烤包子的牛油蜜糖“饼”

她们说好吃,yummy, ho jiak咯...
想念Texas Chicken 的招牌Honey Butter Biscuits,Google一番发现家里竟然都有这些基本材料。想做就做吧,外型就不可靠啦(婆妈的我坚持不能看那一坨坨的排在烤盘上,硬是要整成圆形⭕️,可是味道很可以的,哈哈哈哈!

牛油蜜糖松饼

{材料} 普通面粉280克,冷无盐牛油120克, 糖粉2汤匙(也可以用其它糖代替),发粉4茶匙,牛奶140克,醋2茶匙。

{抹表面用} 有盐或无盐牛油20克,蜜糖2汤匙。

{做法}

1. 面粉, 牛油(一定要用冷的),糖粉和发粉用手耐心地搓成面包糠状。

2. 牛奶加醋搅拌均匀后静置5分钟,倒入捏成面团。

3. 烤盘铺上油纸,一份份面团量好捏好排好。(我选择用手,松饼份量依个人喜好,松饼的形状可以很随性。)

4. 放入预热好的烤箱180°C中层,先烤15分钟;然后去出抹上牛油和蜜糖再烤5分钟左右即可。

5. 烤好,想要更上色再抹上薄薄一层牛油蜜糖。

Honey Butter Biscuits

{Ingredients} All purpose flour x 280g, cold unsalted butter x 120g, icing sugar x 2 tbsp (can replace with other sugars), baking powder x 4 tsp, milk x 140g, vinegar x 2 tsp.

{Glazing} Salted or unsalted butter x 20g, honey x 2 tbsp.

{Directions}

1. Mix the flour, cold butter, sugar and baking powder until resembles bread crumbs mixture.

2. Mix milk with vinegar and rest for 5 mins, pour into the mixture and mix until form a slightly sticky dough.

3. Put a slice of baking sheet on top of the baking tray, transfer the right amount of dough to the tray, and arrange well. (I use hand to shape the dough, the biscuit’s size and shapes according to personal preferences.)

4. Bake in pre-heated oven at 180°C for 15 mins first, glaze the top of biscuits with honey butter mixture and bake for another 5 mins or until golden brown colour.

5. Remove baking tray from oven, glaze again a thin layer of honey butter mixture for better colour (optional), and let it rest for 5 mins before enjoy it.

Previous: 香茅柠檬姜茶 Fresh Lemongrass Lemon Ginger Tea

Friday, June 5, 2020

香茅柠檬姜茶 Fresh Lemongrass Lemon Ginger Tea

柠檬香茅姜茶 Fresh Lemongrass Ginger Tea
1,2,3....4种材料,高压锅一键搞定就能享受香气扑鼻暖胃安神茶,而且有助于养生养颜哦!

减少了户外活动,为了排除身体不必要的毒素,Google了一番后决定就煲它-香茅柠檬姜茶的功效多着呢...不过,最重要的是材料简单,家里有嘛,就是少了斑兰叶而已,不然更“香”!

香茅柠檬姜茶

{材料} 香茅200克(洗净切段状,用刀在下端割几刀再拍几下更易出味),姜片X 3-5片,石蜂糖适量(也可以用其他冰糖,依个人口味哦!),清水2000-3000毫升,柠檬一粒(榨汁备用)

{做法}

1. 把全部材料准备好后放入锅内(除了柠檬汁),加入适量的清水。

2. 然后,按下高压锅的“煲汤“功能,煮好后再放一茶匙柠檬汁搅拌均匀即可享用。

Lemongrass Lemon Ginger Tea

{Ingredients} Lemon grass x 200g (washed and sectioned, bash stalks with the back of knife for better flavour.) sliced gingers x 3-5, some honey rock sugar (according to personal preference),  water 2000-3000ml, lemon x 1 pcs (juices).

{Directions}

1. Put all the ingredients into the pressure cooker (except lemon juice), and add in right amount of water.

2. Then, press “soup” button on pressure cooker to cook it, served warm hot with a tsp of lemon juice or according to personal preference.

Previous:红豆牛奶冰淇淋 Red Bean Milk Ice Cream

Featured Post

A MUST CNY cookies 🥜花生酱饼 Peanut Butter Cookies #cny2025

坚持每年都在做的年饼👉🏻花生酱饼 长视频里有材料和制作过程哦👇🏻 🍊花生酱饼 Peanut Butter Cookies https://youtu.be/KqZTC6KM2HU https://youtu.be/_vIQaziICjk 其它年饼👇🏻 🏮彩...