Saturday, July 25, 2020

清汤干捞米粉 Clear Soup Instant Rice Vermicelli

清汤干捞米粉 Clear Soup Instant Rice Vermicelli(料多多版)
杂蔬红枣枸杞鸡汤预先用高压锅煮好
一些基本材料先轮流预先用沸水川烫煮熟备用。

海鲜豆腐和豆腐可以加入高汤中煮熟。

料十足的摆盘果然很吸睛,天使们吃得津津有味呢...
很久之前写过简易版的清汤干捞米粉,其实三不五时我都很爱利用家里有的材料随便捞一捞粉面类就有一餐啦...

清汤干捞米粉

{材料} 米粉适量,水煮鸡蛋,海鲜豆腐(切片状),豆腐(切大丁状),萝卜丝,青菜丝,青葱丁,蒜碎,小红葱碎

{调味料} 黑酱油 几滴,酱油1茶匙,蚝油1汤匙,蒜葱油1汤匙,高汤1/2 杯 ,盐和胡椒粉少许。(全部混合拌均备用,这是2-3人份的量。)

{做法}

1. 起3汤匙油锅爆香蒜葱碎至深金黄色即可捞起备用,油就倒入调味料碗中拌均待用。

2. 米粉用沸水川烫至熟沥干备用。

3. 青菜丝和青葱丁用加了点盐和油的沸水川烫2分钟,沥干备用。

4. 用适量的高汤把海鲜豆腐,豆腐和萝卜丝煮熟备用。

5. 盘内放入煮熟的米粉,淋上3-5汤匙做法1的调味料捞一捞,然后加入蒜葱碎,煮熟的青葱丁,青菜丝,萝卜丝,海鲜豆腐,再把水煮鸡蛋切片摆入盘上即可享用。

***杂蔬红枣枸杞鸡汤材料:鸡半只,红枣5粒,枸杞适量,萝卜1条(切块),马铃薯块和山药块适量,盐适量。

Clear Soup Instant Rice Vermicelli

{Ingredients} Some vermicelli, hard boiled eggs, seafood tofu slices, tofu (diced), shredded carrots, shredded green veggies, green onions (diced), chopped garlic and shallots.

{Seasonings} Dark soy sauce few drops, soy sauce x 1 tsp, oyster sauce x 1 tbsp, garlic shallot oil x 1 tbsp, broths x ½ cup, some salt and pepper (Mix all well and set aside, this is for 2-3 person’s portion.)

{Directions}

1. Heat up 3 tbsp of oil to saute chopped garlic and shallots till dark golden yellow, remove and set aside, oil pour into the bowl with well mixed seasonings.

2. Vermicelli blanch over boiling water till cooked, drain well and set aside.

3. Shredded green veggies and diced green onions also blanch over boiling water that add with some salt and oil for 2 mins, drain well and set aside.

4. Use some cooked broths to cook seafood tofu, tofu and shredded carrots, set aside.

5. Put the cooked vermicelli on the plate, pour in 3-5 tbsp of method 1 seasonings to mix well, follow by add in deep fry chopped garlic and shallots, cooked green onions, green veggies, carrots, seafood tofu, hard boiled egg’s slices. Serve hot.

***Chicken soup with mixed veggies, red dates and goji berries: chicken x half, red dates x 5, some goji berries, carrots x 1 (diced), some diced potatoes and Chinese yam, salt in right amout.

Previous:豆腐鸡肉蒸蛋 Tofu Chicken Steamed Egg

Saturday, July 18, 2020

豆腐鸡肉蒸蛋 Tofu Chicken Steamed Egg

豆腐鸡肉蒸蛋 Tofu Chicken Steamed Egg
她们口中的favorite food之一,差不多每隔一周一定至少会煮一次的蒸蛋料理,材料大多随机应变。其实生活很简单滴...只要“欲望”别太大!欲望合理了,自然就修剪了满足不了的痛楚。来来来,男女人们,一起努力加强自控力,远离物质社会给出的生活“陷阱”吧!

豆腐鸡肉蒸蛋

{材料} 鸡蛋2粒,豆腐半盒,鸡肉丝适量(可以用米酒和玉米淀粉腌5分钟,不腌也行啦),高汤或清水适量(鸡蛋液 vs 清水= 1 vs 1.5)。

{调味料} 酱油1汤匙,芝麻油1茶匙,胡椒粉适量。

{做法}

1. 全部材料和调味料放入蒸碗中,拌均后入蒸锅蒸12-15分钟左右。

Tofu Chicken Steamed Egg

{Ingredients} Eggs x 2, tofu x ½ box, some shredded chicken (marinate with some rice wine and corn starch for 5 mins or do nothing.), some broth or water (egg mixture VS water = 1 VS 1.5)

{Seasonings} Soy sauce x 1 tbsp., sesame oil x 1 tsp, some pepper.

{Directions}

1. Mix all the ingredients and seasonings well, steam for 12-15 mins.

Previous:海鲜炒面 Seafood Fried Noodle

Friday, July 17, 2020

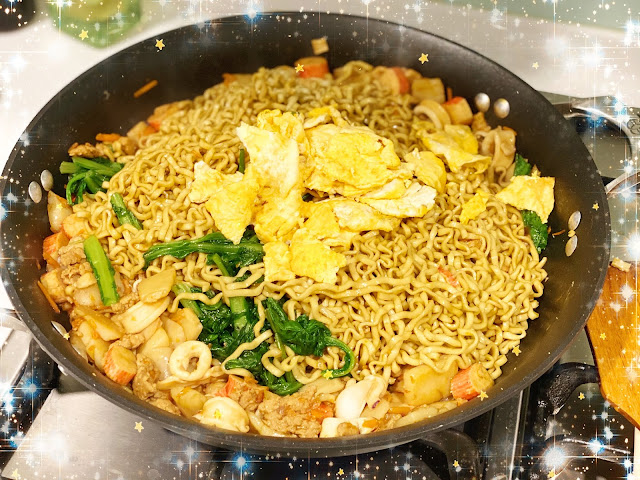
海鲜炒面 Seafood Fried Noodle

海鲜炒面 Seafood Fried Noodle 
总是料很多才觉得很有视觉效果,吃了也过瘾,呵呵!
说真的,当了“婆妈”那么久最常做的就是炒米粉,面,粿条或饭,还有一锅熟的料理。从什么都不会到如今越来越“驾轻就熟”的血泪史就甭提了吧(虽然专挑那些建议快手的食谱来学😄),过程从来就是当事人的“私事”。想说的是,烹饪真的是能够减压且能享受生活的一门艺术,只要男女人们不断用心付出,赚到的远比你想象中的更多!💕😍❤️☺️😋

海鲜炒面

{材料} 面条适量(过热水川烫一分钟左右),花枝圈适量,蟹柳3条(切块状),鱼饼片适量,虾适量,鸡蛋3粒(加点胡椒粉打散备用),肉碎3汤匙(加点芝麻油和胡椒粉腌5分钟),青菜适量(用加了点盐和油的沸水川烫1分钟,捞起备用),蒜碎3汤匙和小红葱碎适量。

{调味料} 黑酱油1茶匙,酱油2汤匙,豆瓣酱 ½ 茶匙,蚝油1茶匙,高汤 ½ 杯 。

{做法}

1. 起油锅先把鸡蛋炒熟备用。

2. 再起3汤匙油锅爆香蒜葱碎, 加入肉碎,花枝圈,蟹柳,鱼饼和调味料拌炒均匀。

3. 然后,加入面条和虾拌炒2分钟左右后加入鸡蛋和青菜炒均匀或至汁收干即可。

Seafood Fried Noodle

{Ingredients} Noodle (Blanch over with hot water for 1 mins), some squid ring, crabsticks x 3 (sliced), some fish cake slices, some shrimps, egg x 3(beaten with some pepper), minced meat x 3tbsp (marinate with some sesame oil and pepper for 5 mins), some green vegetables, some chopped garlic and shallots.

{Seasonings} Black soy sauce x 1 tsp, soy sauce x 2 tbsp, bean paste x ½ tsp, oyster sauce x 1 tsp, broths x ½ cup.

{Directions}

1. Heat up oil to fry the egg mixture till cooked and set aside.

2. Heat up frying pan with 3 tbsp of olive oil to saute chopped garlic and shallot till fragrant, add in minced meat, squid, crab sticks, fish cakes plus seasonings to stir-fry till well combined.

3. Then, add in noodle and shrimps to continue stir-frying for about 2 mins only add in egg and veggies to cook till gravy is thickening, serve hot.

Previous:核桃黑糖香蕉蛋糕 Brown Sugar Walnut Banana Cake

Saturday, July 11, 2020

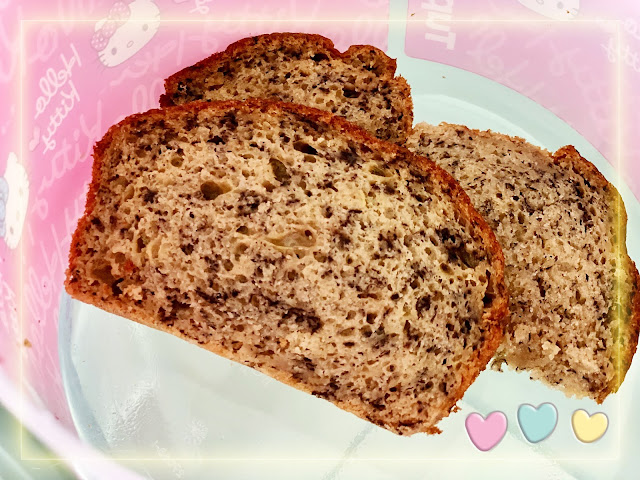
核桃黑糖香蕉蛋糕 Brown Sugar Walnut Banana Cake

核桃黑糖香蕉蛋糕 Brown Sugar Walnut Banana Cake
加了核桃碎的香蕉蛋糕准备当中...
没了柠檬汁,香蕉泥有点黑,但不影响烤出来的结果!
一样烤了35-40分钟左右的核桃黑糖香蕉蛋糕。
加了核桃碎的黑糖香蕉蛋糕,虽然说继续烘焙的亲子活动,她们才能忙得不亦乐乎。少了柠檬汁,没有等久久,只让香蕉泥休息20分钟而已就拌入面粉糊里。不过,这次忘了加水才烤,所以蛋糕表面有点开裂,不过不影响她们的食欲,呵呵😄

核桃黑糖香蕉蛋糕

{材料} 熟透香蕉泥250克,核桃碎适量,苏打粉1茶匙,鸡蛋3粒,黑糖70克,自发面粉130克,盐少许,玉米油50毫升。

{做法}

1. 熟透的香蕉用叉子或按压器压成泥状,然后再加入苏打粉混合均匀后盖好静置45分钟。

2. 鸡蛋和黑糖用搅拌器打散,搅拌至糖融化即可,不必打发。然后,筛入自发粉和盐搅拌至无颗粒状备用。(别搅拌过度哦!)

3. 加入香蕉泥和核桃碎拌均再盖好待发30-40分钟左右,最后加入玉米油搅拌均匀,再让面糊休息5-10分钟。烤盘抹一些牛油或玉米油再把面糊倒入,准备烤。

4. 预热烤箱160°C, 烤45分钟左右。(烤箱温度得自行拿捏哦!)

***记得预热烤箱前先在烤箱底层倒入200毫升的清水,可以预防蛋糕表面裂开。

Brown Sugar Walnut Banana Cake

{Ingredients} Mashed very ripe banana x 250g, some chopped walnut, baking soda x 1 tsp, eggs x 3, brown sugar x 70g, self-raising flour x 130g, some salt, corn oil x 50ml.

{Directions}

1. Mash the very ripe bananas in a bowl until fine, add in baking soda to mix them well and set aside for 45mins.

2. Beat the eggs and sugar till well combined, don’t need to be foamy. Then, sift in the self-raising flour and salt, stir and mix until the flour is fully dissolve. (Do Not over mix!)

3. Add in mashed banana and chopped walnuts, gently stirring until well combined before pour in corn oil, continue stirring till mix well, let the batter rest for 5-10 mins. Grease the baking pan with some melted butter or corn oil only pour in the batter.

4. Preheat oven 160°C, baked for 45 mins. (Oven temperature adjust accordingly.)

***Before preheat the oven, pour in 200ml water at the bottom of oven, to have a better or nice cake surface.

Previous: 鸡蛋葱油饼 Scallions Egg Pancake

Friday, July 10, 2020

鸡蛋葱油饼 Scallions Egg Pancake

鸡蛋葱油饼 Scallions Egg Pancake
“久违”的和面,不过为了解馋就得亲力亲为...
材料备齐,方便“开工”
捏,揉,搓,捏,揉,搓不停...
手法不熟练,勉强“过关斩将”...不至于太糟糕,就放过自己才能做得开心😄
隔天早上,调一下酱料,拿出昨晚弄好的面饼就可以“开工”啦...
先把面饼双面煎成金黄色

下手太“重”,调料的黑酱油和五香粉可以再减些了,感觉到完成品是“有点儿黑黑”的鸡蛋葱油饼!
很多步骤的一餐,但只要提前一晚做好准备,其实隔天早上不至于那么手忙脚乱!婆妈版的外形都不怎么讨喜,虽然不是大厨级的味蕾享受但就很有暖暖的家庭味咯...平常“婆妈”不会那么热血澎湃搞这么多花样早餐,久久久久久久一次而已咯,哈哈哈😂😂

鸡蛋葱油饼

{材料A} 面粉200克,盐2克,热开水90克,冷水30克,玉米油1茶匙。

{材料B}合隆厨师煎炸粉20克,玉米油30克(用猪油更好,会有点不健康但是更香!
),盐2克。先在锅中小火热玉米油,才倒入煎炸粉和盐的碗中搅拌均匀即可待冷备用。

{材料C} 青葱丁(洗净,泡在了一点油和盐的温开水中10分钟,沥干和用厨房纸巾稍微收干备用),盐一点点和五香粉适量。

{材料D} 鸡蛋4粒。

{酱料调味料} 黑酱油1茶匙,酱油 ½ 茶匙, 番茄酱1茶匙,五香粉 ½ 茶匙,水3汤匙,芝麻油,蒜碎,糖和胡椒粉少许,混合均匀。

{做法}

1. 材料A:粉料筛过后逐步加入盐和热开水用筷子搅拌成絮状后再加入冷水搅拌均匀。加入1茶匙玉米油用手大概揉成面团,静置松弛45分钟至1小时比较好揉合成面团。

2. 等的过程吧材料B和C准备好。

3. 面团静置好后取出,揉成稍微光滑的面团,平均分成4份。

4. 拿一份面团擀成长形的面皮,在表面上涂上材料B,再撒上材料C(盐真的一点点就好,口味淡不放也行啦。)

5. 把一半的面皮向另一边折对1/3, 然后由一头开始卷起卷成卷后,收口捏紧竖放。把另外三分面团也卷好竖放。

6. 再把每一份面卷按扁成不太厚也不太薄的大饼状。(隔天早上用的话,记得每个饼之间一定要放张油纸隔开避免黏在一起,盖上保鲜膜放入冰箱冷藏。隔天早上拿出即可煎。)

7. 平底锅中适量的油烧热,将饼放入双面煎成金黄色, 盛起抹上酱料备用。

8. 平底锅再加一点油,打一粒鸡蛋进去煎至单面半熟时,加入适量的酱料再放入煎好的饼煎至熟再翻面将另一面煎熟就好。(酱料也可以煎时不放,吃时拿来蘸着吃也行啦。)

Scallion Egg Pancake

{Ingredients A} Flour x 200g, salt x 2g, hot water x 90g, cold water x 30g, corn oil x 1 tsp.

{Ingredients B} Hup Loong Cook’s frying powder x 20g, corn oil x 30g (Use pork lard for more fragrant even not that healthy!), salt x 2g. Heat up corn oil in a pan under low heat, then pour over into the bowl that with frying powder and salt to mix them till well-combined.

{Ingredients C} Diced green onion (washed, soaked in warm water that add in with some oil and salt for 10 mins, drain well and dry it with kitchen towel), some salt and five spices powder.

{Ingredients D} Eggs x 4.

{Sauce Seasonings} Black soy sauce x 1 tsp, soy sauce x ½ tsp, tomato sauce x 1 tsp, five spices powder x ½ tsp, water x 3 tbsp, some sesame oil, chopped garlic, some sugar and pepper, mix them well.

{Directions}

1. Ingredients A: Sifted the flour, add in salt and mix them well; follow by add in hot water and continue to stir till well combined, add in cold water to mix again till well combined. Add in 1 tsp of corn oil to knead the dough and let it sit aside for at least 45 mins or 1 hour.

2. While waiting, prepare ingredient B and C.

3. Once the dough well “rest”, slightly continue knead till get the smooth dough and divide to 4 portions.

4. Each portion roll it to long oval shape , put on ingredient B follow by ingredient C (A pinch of salt will do else can be ignore.)

5. Then, fold and roll it up, follow by seal it up tight and let it rest vertically. Repeat these steps for each portions.

6. Flatten the dough by press it firmly to make a non too thick or too thin layer of big circle. (If only use next morning, pls cover with a layer of baking paper or food wraps for each pcs of the flatten uncooked pancake and keep refrigerated.)

7. Heat up 1tsp of oil in frying pan, put in a pcs of uncooked pancake to fry till both side shown light golden yellow, dish up and put on the seasoning’s sauce.

8. Add in some oil in the frying pan to fry the egg, add about ½ tsp of seasoning’s sauce when egg is half way cook, follow by put back in the cooked pancake to cook till both side is cooked. (Seasoning’s sauce can use as dipping sauce if do not prefer to use it while cooking.)

Previous: 简易酱蒸鱼 Steamed Fish with Quick Sauces

Sunday, July 5, 2020

简易酱蒸鱼 Steamed Fish with Quick Sauces


简易酱蒸鱼 Steamed Fish with Quick Sauces 
腌,蒸,淋就可开吃咯。
已经洗好去骨切片的鱼肉比较容易处理,再次洗好,腌,蒸,淋上特调简易酱足以让味蕾好好的享受一顿啦。

简易酱蒸鱼

{材料} 鲜鱼一条 (洗净切好,用酸梅酱2汤匙,料酒1茶匙,姜碎1汤匙,盐和胡椒粉少许腌30分钟),番茄1粒(用热水川烫去皮切块状),姜碎1汤匙,蒜碎5汤匙,青葱丁3汤匙。

{调味料} 酱油1汤匙。

{做法}

1. 鱼肉片腌好后, 放上番茄块,入蒸锅蒸8-10分钟左右。

2. 蒸鱼的同时,起三汤匙油锅爆香蒜姜碎至金黄色时,加入青葱丁和酱油,拌均即可盛起备用。

3. 鱼蒸好后,倒掉一半的蒸鱼水,马上淋上做法2的酱料,趁热享用。

Steamed Fish with Quick Sauces

{Ingredients} Fresh fish fillets (washed, marinate with plum sauce x 2 tbsp, Shao Xing Wine x 1 tsp, chopped ginger x 1 tbsp, some salt and pepper for 30 mins), tomato x 1 (blanch over in hot boiling water to remove the skin and sliced), chopped ginger x 1 tbsp, chopped garlic x 5 tbsp, diced green onion x 3 tbsp.

{Seasonings} Soy sauce x 1 tbsp.

{Directions}

1. Put the tomato slices on top of marinated fish fillets, steam for 8-10 mins.

2. While the fish is steaming, heat up 3 tbsp og oil to sauté chopped garlic and ginger till golden yellow, add in diced green onion a tbsp of soy sauce, mix well and set aside.

3. Once done steamed, pouring out half of the steamed fish water, then pour over the quick sauce (directions 2)on top of the fish fillets, serve hot.

Previous: 热狗蛋面包 Hot Dog Egg Bun

Friday, July 3, 2020

热狗蛋面包 Hot Dog Egg Bun


热狗蛋面包 Hot Dog Egg Bun 
煎好热狗,才把鸡蛋打入煎至半熟加入煎好的热狗卷起煎至鸡蛋熟即可。
30分钟之内就可以OK的一餐
配上小黄瓜与圣女果,宅在家简易早餐之一的热狗蛋面包搞定!
婆妈版的简易早餐之一,不出门几个月“功力”增强了许多。原来宅在家也能变出很多种“法术”,随意搭配就能全权支配家里现有的简单材料。男女人们,以下供参考的食谱是一人份的而已哦,超过一人自行复习“加法”,OK😂。

热狗蛋面包

{材料} 热狗面包1个,热狗1条,鸡蛋1粒。

{配料} 圣女果和小黄瓜适量。

{做法}

1. 面包对半切开(但没切断)备用。

2. 不沾锅抹上薄薄一层无盐牛油先把热狗煎熟推去锅边,再把鸡蛋打入煎至半熟再把热狗加入卷起煎至鸡蛋熟。

3. 然后,把热狗蛋卷放入面包中间即可趁热享用。(可以放上适量的辣椒酱,配料随意哈!)

Hot Dog Egg Bun

{Ingredients} Hot dog bun x 1, hot dog x 1, egg x 1.

{Side dishes} Some cherry tomatoes, mini cucumber slices.

{Directions}

1. Cut down the middle of hot dog bun. (Do not cut all the through ya!)

2. Non-stick pan, layer with a thin unsalted butter to fry the hot dog till cook and push aside, break an egg into the pan to fry till half cook, put back the cooked hot dog and roll it up to continue cook till egg is fully cooked.

3. Then, put the cooked hot dog egg roll in the middle of the hot dog bun and serve hot. ( Top with some chili sauce, side dishes according to personal preference ya!)

Previous: 酥皮吞拿鱼角 Mayonnaise Tuna Puff Pastry

Featured Post

A MUST CNY cookies 🥜花生酱饼 Peanut Butter Cookies #cny2025

坚持每年都在做的年饼👉🏻花生酱饼 长视频里有材料和制作过程哦👇🏻 🍊花生酱饼 Peanut Butter Cookies https://youtu.be/KqZTC6KM2HU https://youtu.be/_vIQaziICjk 其它年饼👇🏻 🏮彩...