Friday, August 28, 2020

萝卜肉碎蒸蛋 Carrots Minced Meat Steamed Egg

萝卜肉碎蒸蛋 Carrots Minced Meat Steamed Egg
C和J的最爱,蒸蛋捞饭...


这篇再忙都得写,是J天使第一次要求自己全程动手做的哟。❤️,真的是一切的答案。很多事强求不来...「婆妈」真的真的真的很激动,这小天使是怎么逼都逼不来的,却认认真真地学了快半年的厨艺。曾经日日大闹厨房的她已从无能为力+无理取闹等的阶段来到如今可以帮忙甚至可以自己做一些简单的料理咯。目前为止,与鸡蛋有关的她都一定要来帮忙,哈哈。为了留念加上她偶尔愿意配合,就试做录影片段珍藏起来🥰

***J下厨乐记https://youtu.be/wr5JQpFXYlY


萝卜肉碎蒸蛋

{材料} 鸡蛋2粒,肉碎(用一点点酱油,胡椒粉腌制一下),萝卜丝,高汤或清水适量(鸡蛋液 vs 清水= 1 vs 1.5)。

{调味料} 酱油 ½ 茶匙,芝麻油 ½ 茶匙,胡椒粉适量。

{做法}
1. 全部材料和调味料放入蒸碗中,拌均后入蒸锅蒸15分钟左右。

***想要蒸好后表面平滑的煮妇煮夫们,请务必轻轻搅拌和过滤蛋液,还有蒸锅裹布确保水滴别到表面上哈。

Carrots Minced Meat Steamed Egg

{Ingredients} Eggs x 2, minced meat (marinate with some soy sauce and pepper), shredded carrots, some broth or water (egg mixture VS water = 1 VS 1.5)

{Seasonings} Soy sauce x ½ tsp, sesame oil x ½ tsp, some pepper.

{Directions}

1. Mix all the ingredients and seasonings well, steam for 15 mins.

***To have smooth steam egg, lightly beating the eggs mixture and filter it to remove the lump and bubbles ya. Sorry that I'm skipping that step.

Previous:自制肉丸子蒸蛋 Homemade Meatballs Steam Egg

Sunday, August 23, 2020

自制肉丸子蒸蛋 Homemade Meatballs Steam Egg

自制肉丸子蒸蛋 Homemade Meatballs Steam Egg
做给天使们的食物大多能极简就从简,很多男女人们好奇这么清淡她们会有胃口吃吗?!其实从她们开始接触辅食品到副食品到正餐的过程中,只要从无到有调味料的时候记得记得记得下手轻点轻点再轻点,她们能吃就不用加调味料,开始嫌弃的一岁多后就真的真的真的酌量加一点点,就真的是一点点。如今我的大天使5岁多了依然可以接受清淡的家庭味,就算已接触很多外面的美味佳肴而不会嫌弃哦。所以说,“基础”打好,天使们绝对🆗!(之前不敢那么大声说,经过老二3岁多的再次“复测”发现真的没问题。)

自制肉丸子蒸蛋

{材料} 鸡蛋2粒,自制肉丸12粒,高汤或清水适量(鸡蛋液 vs 清水= 1 vs 1.5)。

{调味料} 酱油1茶匙,芝麻油 ½ 茶匙,胡椒粉适量。

{做法}

1. 全部材料和调味料放入蒸碗中,拌均后入蒸锅蒸15分钟左右。

***想要视觉效果好,请轻轻搅拌和过滤蛋液让表面蒸后平滑。(请原谅婆妈偷懒要快😂)

Homemade Meatballs Steam Egg

{Ingredients} Eggs x 2, homemade meatballs x 12, some broth or water (egg mixture VS water = 1 VS 1.5)

{Seasonings} Soy sauce x 1 tsp, sesame oil x ½ tsp, some pepper.

{Directions}

1. Mix all the ingredients and seasonings well, steam for 15 mins.

***To have smooth steam egg, lightly beating the eggs mixture and filter it to remove the lumps and bubbles ya. Sorry that I'm skipping that step😅.

Previous:自制肉丸子豆腐蛋花汤 Homemade Meatball Tofu Egg Drop Soup

Saturday, August 22, 2020

自制肉丸子豆腐蛋花汤 Homemade Meatball Tofu Egg Drop Soup

自制肉丸子豆腐蛋花汤 Homemade Meatball Tofu Egg Drop Soup
材料准备好
一气呵成就煮好了
有了天使们以后,大多时候都会自制猪或鸡肉丸速冻冷藏(可以保鲜1个月左右哦)。要煮时才提前一晚放在冰箱解冻隔天用。

自制肉丸子豆腐蛋花汤

{自制肉丸材料} 猪肉碎200-250克, 小红葱碎1茶匙,姜碎一点,虾两只,鸡蛋液1茶匙,青葱丁1汤匙,玉米淀粉1-2茶匙,盐和胡椒粉适量。全部材料拌均匀,用手搓圆备用。(可以多做一些,搓圆后马上速冻冷藏。)

***买肉时选梅肉来绞碎或自己回家剁碎,梅肉口感很OK。

{材料} 肉丸20粒,鸡蛋2粒(加入一点酱油,胡椒粉和芝麻油打散备用),蛋豆腐1条(切块状),小萝卜条适量(切条状),高汤或清水适量(我做给两个娃的份量就600毫升),蒜碎和小红葱碎适量。

{调味料} 酱油1茶匙,芝麻油 ½ 茶匙,盐和胡椒粉适量, 玉米淀粉水一汤匙。(勾薄芡而已;淀粉1茶匙,水一汤匙)

{做法}

1. 取一深锅,用橄榄油爆香蒜葱碎后加入高汤或清水,肉丸,蛋豆腐和小萝卜条煮沸。

2. 煮沸后,加入玉米淀粉水搅拌一下后,慢慢地淋入鸡蛋液和其它调味料轻轻搅拌均匀后再次煮滚即可。

Homemade Meatball Tofu Egg Drop Soup

{Meat ball Ingredients} Minced pork x 200-250g, chopped shallots x 1tsp, some chopped ginger, shrimp x 2pcs, egg mixture x 1 tsp, diced green onions x 1 tbsp, corn starch x 1-2 tsp, some salt and pepper. Mix all together, shape it to round ball shape. (Can do more in advance to keep frozen in fridge)

***Choose tender Loin when you buy the meat, better taste.

{Ingredients} Meat balls x 20pcs, eggs x 2 (beaten with some soy sauce, pepper and sesame oil), egg tofu x 1 (cut into pieces), some baby carrots (sectioned), some broth or water (for 2 angels’ portions, I use 600ml), some chopped garlic and shallots.

{Seasonings} Soy sauce x 1 tsp, sesame oil x ½ tsp, some salt and pepper, corn flour solution x 1 tbsp (to slightly thicken the soup; corn starch 1 tsp, water 1 tbsp)

{Directions}

1. Use soup pot, heat up a tbsp of olive oil to saute chopped garlic and shallot till fragrant only pour in the broth or water, follow by meat balls, egg tofu and baby carrots, bring it to boil.

2. Then, add in corn flour solution and stirring a while, slowly pour in the egg mixture and bring it to boil again, serve hot.

Previous: 香茅蜂蜜菊花柠檬姜茶 Lemongrass Honey Lemon Chrysanthemum Ginger Tea

Sunday, August 16, 2020

香茅蜂蜜菊花柠檬姜茶 Lemongrass Honey Lemon Chrysanthemum Ginger Tea

香茅蜂蜜菊花柠檬姜茶 Lemongrass Honey Lemon Chrysanthemum Ginger Tea
比起香茅柠檬姜茶, 这加了蜂蜜和菊花的更受天使们喜爱哟。她们口口声声不断地提了又提很好喝的时候,就知道这款饮料将持续出现在家的机率提高了😂

香茅蜂蜜柠檬菊花姜茶

{材料} 香茅6根(洗净切段状,用刀在下端割几刀再拍几下更易出味),菊花10克(装进小茶包可以滤渣), 蜂蜜3汤匙,姜片X 3-5片,石蜂糖适量(也可以用其他冰糖,依个人口味哦!),清水适量2000-2500毫升,柠檬一粒(榨汁备用)

{做法}

1. 把全部材料准备好后放入锅内,加入适量的清水。

2. 然后,按下高压锅的“煲汤“功能,煮好待稍微温时享用。

Lemongrass Honey Lemon Chrysanthemum Ginger Tea

{Ingredients} Lemon grass x 6 sticks (washed and sectioned, bash stalk with the back of knife for better flavour.), chrysanthemum flowers x 10g (pack in filter bag for tea), honey x 3tbsp, sliced gingers x 3-5, some honey rock sugar (according to personal preference), some water 2000-3000ml, lemon x 1 pcs (juices).

{Directions}

1. Put all the ingredients into the pressure cooker, and add in right amount of water.

2. Then, press “soup” button on pressure cooker to cook it, served warm hot.

Previous:幼滑马铃薯泥 Creamy Mashed Potatoes

Saturday, August 15, 2020

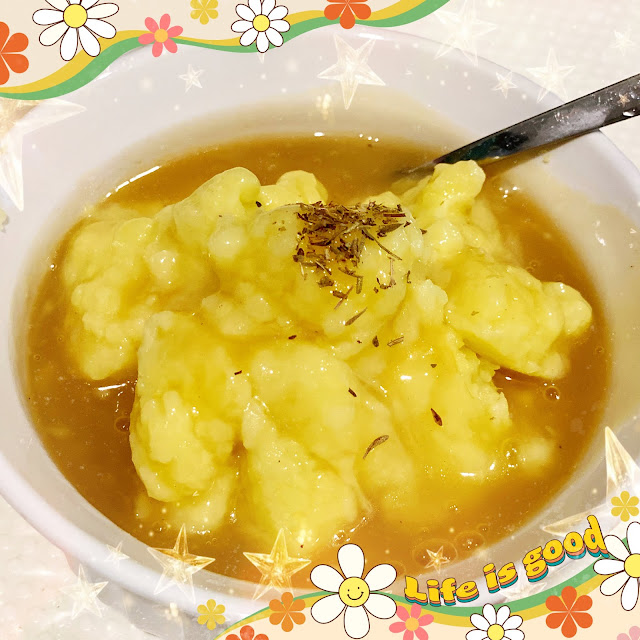
幼滑马铃薯泥 Creamy Mashed Potatoes


幼滑马铃薯泥 Creamy Mashed Potatoes
材料准备好就可一次过做好。
一种食材就可以搞定我家天使们的两餐啦。
煮酱汁淋上即可开吃,配馒头面包也都可以。
奶香味的薯泥,

我家天使们很爱很爱很爱奶味十足的薯泥,很多时候是我煮好但在她们眼里看起来有点“干”,她们还会要求酱汁再多一点,所以喜欢奶味浓郁的自行再加10-20毫升的牛奶哈 (50克=50毫升)。

幼滑马铃薯泥

{材料} 马铃薯250克, 牛奶50毫升,无盐牛油18克, 盐 ½ -1茶匙。

{酱汁} 蚝油1 ½ 汤匙, 玉米淀粉1 ½ 茶匙, 红糖1 ½ 茶匙, 牛奶3汤匙, 水150毫升, 胡椒粉适量, 搅拌成混合酱汁备用(除了牛奶在煮时才加入)。

{做法}

1. 马铃薯洗净去皮切块状, 蒸锅蒸20-25分钟至熟后压成泥状。(喜欢更绵密的口感,请用搅拌器搅成泥哈。)

2. 接着锅内放入无盐牛油融化后,放入薯泥,盐和牛奶,开始中火搅拌至稍微收干即可。(盐一点点的加入比较好,随个人的口味哦)

3. 然后,锅中再放入1汤匙的牛油融化后,倒入搅拌好的酱汁煮滚后加入牛奶搅拌均匀就OK啦,趁热享用味道极佳。(可以撒上些干香料,除了视觉效果也能提提味啦,哈哈😄)

Creamy Mashed Potatoes

{Ingredients} Potato x 250g, milk x 50ml, unsalted butter x 18g, salt x ½ -1 tsp.

{Sauces} Oyster sauce x 1 ½ tbsp, corn starch x 1 ½ tsp, brown sugar x 1 ½ tsp, milk x 3 tbsp, water x 150ml, some pepper, mix all well (except milk only add in while cooking).

{Directions}

1. Wash and peel the potatoes, cut into diced shape, steam for 20-25mins, mash the potatoes with potato masher until smooth or use blender to blend it.

2. Follow by add in unsalted butter to melt in a cooking pan, add in mash potatoes, salt and milk, begin to stir-fry under medium heat till slightly thicken will do. (Salt add in slowly according to personal preference). Set aside.

3. Then, add in another 1 tbsp of unsalted butter to melt, follow by add in the well mixed sauce and bring it to boil only add in milk to continue stirring till combine. Serve hot. (Sprinkle up some mixed herbs if wish too.)

Previous: 面包比萨 Bread Pizza

Sunday, August 9, 2020

面包比萨 Bread Pizza

面包比萨 Bread Pizza
材料随意,基本上要有番茄酱和mozzarella芝士,其它就爱放什么就放什么吧。
这次的材料用了菠菜,小香肠,萝卜丝,甜椒丁和鸡肉碎,全部材料提前水煮或炒好备用。
配料也是随意加,烧卖点心,圣女果,水煮/干锅煎小香肠,苹果片等
面包买多了,就可以考虑一下做这款快手比萨🍕。家里有什么材料都可以随意增减,基本材料要有番茄酱和mozzarella芝士即可。

面包比萨

{材料} 面包5片,番茄酱,mozzarella芝士150克,小香肠5条(切片,干锅煎熟备用),菠菜(用加了点盐和油的沸水川烫一分钟,捞起沥干备用), 萝卜丝,甜椒丁,鸡肉碎(用一点胡椒粉,芝麻油和几滴酱油腌5分钟。),蒜碎少许。

{做法}

1. 起一汤匙橄榄油锅爆香蒜碎,加入萝卜丝和甜椒丁拌炒均匀后加入鸡肉碎炒熟,盛起备用。

2. 将面包片排好在以铺了烘焙纸的烤盘上,均匀的涂抹上番茄酱,撒上第一轮的mozzarella芝士,再把煮好的菠菜叶和炒好的鸡肉碎排满面包片,再加入满满的mozzarella芝士。(芝士的份量依个人口味。)

3. 预热烤箱180°C, 烤大约15分钟左右或至芝士融化即可。(烤箱温度得自行拿捏哦!)

Bread Pizza

{Ingredients} Bread slices x 5, tomato sauce, shredded mozzarella cheese x 150g, cocktail sausages x 5 (sliced, fry and set aside.), baby spinach (blanch over boiling water that add with some salt and 2-3 drop of olive oil, drain and set aside.), shredded carrots, diced bell pepper, minced chicken (marinade with some pepper, sesame oil and few drops of soy sauce.), some chopped garlic.

{Directions}

1. Heat up 1 tbsp of olive oil to saute chopped garlic, add in carrots and bell pepper to fry evenly only add in minced chicken to stir-fry till cooked, set aside.

2. Arrange the bread slices on top of the baking tray that coated with baking paper, spread the tomato sauce evenly on top of bread slices, sprinkle up some mozzarella cheese, follow by add in the cooked spinach and chicken, then add on another layer of mozzarella cheese. (Cheese portions according to personal preference.)

3. Preheat oven 180°C, baked for 15mins or until cheese fully melted. (Oven temperature adjust accordingly.)

Previous:香兰牛油芝士面包 Pandan Butter Mozzarella Cheese Bread


Saturday, August 8, 2020

香兰牛油芝士面包 Pandan Butter Mozzarella Cheese Bread

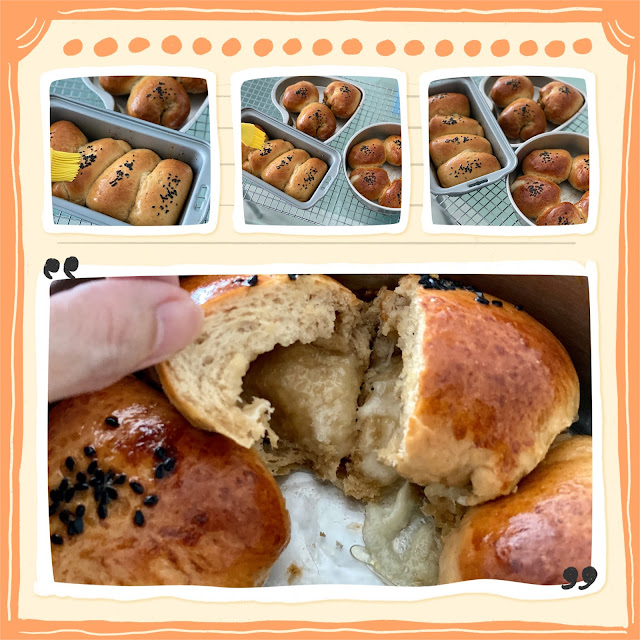
香兰牛芝士面包 Pandan Butter Mozzarella Cheese Bread一

汤种和斑斓液(这次Pandan液很少而已,很淡很淡一点都不提色😅)提早准备好。
全部材料(除了牛油)放入Mixer搅拌均可以拉成薄片状即可加入牛油继续拌均后盖好进行发酵。
第一轮发酵好后,擀平搓成长条切状后,再搓成圆形擀平放上Mozzarella cheese和牛油包好。

天气炎热,这次的二次发酵也需要至少45分钟。
汤种面包放三天都还是软软的,当然现做现吃的口感最为“迷人”!
好久没做面包了,但是一开始做就会爱上家里飘着面包香气的感觉。汤种面包永远是我的首选,因为我们家还是比较喜欢口感软嫩的面包,这类🍞成功率最高啦。哈哈哈,身为婆妈后,失败机率高的食谱得真的真的真的有时间才来“玩”。

香兰牛油芝士面包 

{汤种材料} 高筋面粉25克,清水125毫升(可用牛奶或香兰液代替,Pandan液不够所以没用。)
 ***将水和面粉拌均匀后,小火慢煮至纹路出现即可熄火,待冷后备用(冷藏可放3-5天)。 

{面团材料} 高筋面粉275克,红糖30克,盐1茶匙,酵母3克,香兰液30毫升, 鸡蛋两粒, 有盐奶油20克,汤种。 

{馅料} Mozzarella芝士和牛油适量。 {抹皮} 鸡蛋1粒(打散)或融化牛油适量。 

{做法} 

1. 将湿的面团材料:鸡蛋,Pandan液和汤种预先拌均。 

2. 把干的材料(除了牛油)全部放入搅拌机后—酵母别直接动到糖或盐哦,把做法1的是材料倒入,用低速度搅拌3-5分钟左右。 

3. 当面团可以拉到很薄又不易破裂时,后加入牛油再搅拌1-2分钟。 

4. 取出面团,搓揉成圆形状后盖好湿布进行第一次发酵。(大约1小时) 

5. 第一轮发酵好后,擀平搓成长条状,切块状静置10分钟。再搓成圆形或其它形状后擀平放入馅料包好收口捏紧。 

6. 将面包排在抹了融化牛油的烤盘上,记得要有点距离以免粘在一起。 

7. 第二次发酵大约45分钟,表面抹上鸡蛋液或牛油,撒上黑芝麻(个人喜好)。 

8. 将二次发酵好的面包放入预热烤箱中180°C, 烤30-40分钟左右。(烤箱温度得自行拿捏哦!)

***面包出炉后,还可以再刷上一层融化牛油更香气扑鼻!

Pandan Butter Mozzarella Cheese Bread 

{Ingredients of water roux} High protein flour x 25g, water x 125ml (can replace by milk or pandan juice) 
***Mix water and flour well, cooked under slow heat until the batter forms the firm line shape. Set aside and let it cool. (keep refrigerated can store for 3-5 days.) 

{Dough Ingredients} Bread or high protein flour x 275g, brown sugar x 30g, salt x 1 tsp, instant yeast x 3g, pandan juice x 50ml, eggs x 2, salted butter x 20g, water roux. 

{Fillings} Some mozzarella cheese and butter. 

{Glazing} Egg x1 (beaten) or some melted butter. 

{Directions} 

1. Let’s start with wet ingredients: Mix beaten eggs, pandan juices and water roux well. 

2. Follow by add in all the dry ingredients (except butter) into mixing bowl—don’t’t let the intant yeast directly contact with sugar or salt, then pour in direction’s 1 ingredient, knead under the low speed for about 3-5 mins. 

3. When the gluten of the dough is formed--can pull into very thin sheet without tearing, add in butter and continue to knead for 1-2 mins or till well-combined. 

4. Remove dough from mixing bowl, shape into a smooth ball, cover with plastic wrap or wet cloth to prove till double in bulk. (About 1 hour.) 

5. Flatten and roll the dough into long strip shaped and divide into equal portions, rest for 10 mins. Form into small rounds or other’s desired shapes, flatten dough again and wrap up with the filling, sealed it properly. 

6. Arrange buns onto greased baking tray and ensure they are stay apart to prevent sticking. 

7. Cover and leave to prove till double in sizes (about 45mins), glaze with beaten egg or melted butter, sprinkle some black sesame seeds on top. (personal preference.) 

8. Bake in preheated oven at 180°C for 30-40 mins or till golden brown. (Oven temperature adjust accordingly.)

***Remove, brush with a little more melted butter if wish. 

Saturday, August 1, 2020

紫薯花生内馅大麻糬 Purple Sweet Potato Mochi with Peanut Filling


花生内馅紫薯大麻糬 Purple Sweet Potato Mochi with Peanut

炒熟的花生去皮后用搅拌机搅成花生碎,花生碎加红糖还有花生酱来做内馅。
3-5汤匙玉米淀粉干锅炒10分钟左右,让它变成熟粉备用。
糯米粉,紫薯粉和糖拌均,加温水搅拌至没颗粒状。
加入玉米油或猪油再次拌均。
蒸熟,待冷后开始切,包入馅料和搓圆后裹上炒熟的玉米粉。
花生馅料用完还剩的熟糯米团就直接切了裹上花生糖当Muachi吃咯
斑兰花生内馅麻薯视频分享: https://youtu.be/-6lwZ10R4Xc

一直以来,麻糬糯米糍傻傻分不清楚...不过就是很爱吃这类甜点,做着做着做上瘾啦。不过这次买了阿莫杂货铺的限量版紫薯粉太给力了,省下不少时间,完成品的颜色太令我满足了。放入冰箱冷藏后才吃也是棒棒哒...有时候色香味俱全的“完成品”是必需的,吃了也更有滋味,也很疗愈心情呢😄

花生内馅紫薯大麻糬

{材料} 糯米粉150克,玉米淀粉30克, 限量版紫薯粉1汤匙半,玉米油10克 (用猪油更香), 红糖30克,温水230-250克(不同牌子的糯米粉吸水量不一样哦),盐少许。

{花生内馅} 花生碎50克(也可以买阿莫现成的花生碎),红糖10克 ,花生酱2汤匙。

{裹粉} 玉米淀粉3-5汤匙 (干锅炒10分钟左右变成熟粉备用。)

{做法}

1. 先把花生内馅材料拌均匀,搓成圆球状,放入冰箱冷藏备用。

2. 将糯米粉和玉米淀粉过筛后加入红糖和紫薯粉拌均,逐步加入温水搅拌成均匀的糊状。

3. 把面糊倒入加了10克玉米油或猪油的蒸碗中再次拌均,放入蒸锅蒸20-25分钟左右(面糊全部变透明即可)。

4. 出锅趁热用筷子搅拌约一分钟,用一个保鲜袋或保鲜膜,里面倒入一点玉米油/猪油,把搅拌好的糯米团待稍微凉后全部装进袋子里,轻轻揉约一分钟。(此时可把花生馅料从冰箱取出待用。)

5. 面团从袋子取出后,揉搓成长条状,根据自己的喜好切块状后擀平,将花生馅料放入包好裹粉即可。(过程会很粘手,所以请用一次性手套或善用刚才的一次性纸袋或保鲜膜)

Purple Sweet Potato Mochi with Peanut Filling

{Ingredients} Glutinous rice flour x 150g, corn flour x 30g, purple sweet potato powder x 1 ½ tbsp, corn oil x 10g (use pork lard if got), brown sugar x 30g, warm water x 250g, a pinch of salt.

{Peanuts Filling} Peanuts x 50g, brown sugar x 10g, peanuts jam x tbsp.

{Coatings} Corn starch x 3-5 tbsp, (Dry pan, fry for 10 mins to turn it to cooked powder.)

{Directions}

1. Mix all the peanuts filing ingredients well, turn it to ball shapes and keep it in refrigerator.

2. Mix the sifted glutinous rice flour and corn flour first, follow by add in brown sugar and purple sweet potato powder, then slowly add in warm water to form a batter.

3. Pour the batter into a steamed bowl that already add in 10g of corn oil, mix them well, to steam for 20-25 mins. (or when the batter is completely cooked)

4. Stir with chopstick for about 1 min when done steamed, pour a little oil in a Ziploc plastic bag, drop the cooked paste inside the bag and knead well for about 1 min. (Take out the peanut filling balls from refrigerator now)

5. Remove it out from the plastic bag, roll it into long strip and cut it into square bite size, put in the peanuts filling’s ball in center, close it up and coat it evenly with cooked corn starch powder, serve and enjoys! (Please use disposable plastic gloves or utilize the Ziploc platic bag to close the peanuts filling ball as it will be very sticky.)

Previous:清汤干捞米粉 Clear Soup Instant Rice Vermicelli

Featured Post

A MUST CNY cookies 🥜花生酱饼 Peanut Butter Cookies #cny2025

坚持每年都在做的年饼👉🏻花生酱饼 长视频里有材料和制作过程哦👇🏻 🍊花生酱饼 Peanut Butter Cookies https://youtu.be/KqZTC6KM2HU https://youtu.be/_vIQaziICjk 其它年饼👇🏻 🏮彩...