Saturday, November 28, 2020

红薯杂蔬日式咖喱 Veggies Sweet Potato Japanese Curry

Eat Japanese style curry with tortilla wrap. Try it and you will love it as absolutely a perfect match.日式咖喱很受「婆妈」家两位天使的欣赏,几天前她们提议想要搭配卷饼(tortilla wrap) 吃咖喱。只要没啥过度的要求,做得到的当然OK。Yes, 即煮酱料时间到,因为「婆妈」也煮到想休息啦。S&B咖喱块一直以来很受我们家喜爱,家里大多数一定会有的。 


日式红薯杂蔬咖喱 

{材料} S&B日式咖喱块一包,中红薯1个(洗净去皮切块状,泡水10分钟), 中马铃薯2个(洗净去皮切块状,泡水10分钟),红萝卜半条(洗净去皮切块状),青甜椒块适量,豆腐卜5个(切块),大葱丝,蒜碎和姜碎,清水750毫升。 

{做法} 

1. 起1 ½ 汤匙油锅爆香大葱丝,蒜碎和姜碎,加入马铃薯和红薯块拌炒一下。 

2. 接着加入萝卜和甜椒块继续翻炒均匀,加入750毫升清水拌均匀。 

3. 大火煮沸后转小火,盖好慢煮20分钟左右。 

4. 然后加入咖喱块慢慢搅拌至融化后加入豆腐卜,继续慢煮5分钟左右,要不时轻轻地搅拌。 

5. 趁热搭配卷饼吃,孩子们提议的新颖吃法,绝配。(可以搭配米饭或个人喜好其它的选择) 


Veggies Sweet Potato Japanese Curry 

{Ingredients} S&B curry sauce mix x 1 pack, medium sweet potato x 1 (wash, peel and cut into pieces, soak in water for 10 mins), medium potato x 2 (wash, peel and cut into pieces, soak in water for 10 mins), half carrot (cut into pieces), some green bell pepper, tofu puffs x 5 (slices), shredded onions, chopped garlic and chopped ginger, water x 750ml. 

{Directions} 

1. Heat up 1 ½ tbsp of olive oil to saute onions, garlic and ginger, add in potato and sweet potato pieces to stir fry a while. 

2. Follow by add in carrots and bell pepper to continue stir fry till well combine, add in 750ml of water. 

3. Bring to boil, reduce heat, cover and simmer cook for about 20 mins. 

4. Then, add in curry sauce mix to cook till completely melted only add in tofu puffs to cook for another 5 mins until gravy thickened, stirring occasionally in between. 

5. Serve hot with tortilla wrap, my kid’s idea and absolutely a perfect match (Of course can eat with rice or any others idea according to personal preference). 

Friday, November 27, 2020

桃胶5合一养颜汤水 Peach Gum 5 in 1 Collagen Soup


又炖桃胶糖水滋润养颜养生咯。3合一袋装外加大多男女人们家里一定有的食材枸杞子和红枣,就可以随时喝简易的养颜养生糖水。 这周特别需要甜品调整调整状态,呵呵😄!

桃胶5合一养颜汤水 

{材料} 桃胶/皂角米/雪燕独立包装1包(隔夜泡发,每样分开泡哦),红枣3粒(洗净,去核切半),枸杞适量(洗净)。 

{调味料} 冰糖/红糖适量。 

{做法} 

1. 隔夜泡好后,简单的清理一下桃胶和雪燕的杂质。 

2. 隔水炖法:先将桃胶,皂角米和红枣加入炖盅继续隔水炖30分钟后,再加入冰糖,雪燕和枸杞炖20-30分钟即可品尝。 

***桃胶/皂角米/雪燕,可以盖上保鲜膜放入冰箱隔夜泡发12-15小时。 

Peach Gum 5 in 1 Collagen Soup 

{Ingredients} Snow bird nest/ peach gum/ snow lotus seed x 1 sachet (soak individually for each item overnight), red dates x 3 (rinse and deseed, cut into half), some goji berries (rinse well). 

{Seasonings} Some rock sugar/brown sugar. 

{Directions} 

1. Simple clean the peach gum and snow bird nest, remove impurities.

2. Rice cooker double-boiled: fill in water- half of the stew pot,add in peach gum, snow lotus seed and red dates inside the pot to slow cook for 30 mins only add in rock sugar, snow bird nest and goji berries to cook for another 20-30 mins. Serve hot/warm/chill, according to personal preferences. 

***Peach gum/snow lotus seed/snow bird nest, can cover with wrap and soak overnight in refrigerator for 12-15 hours.    

Sunday, November 22, 2020

干贝家常炒米粉 Homestyle Scallop Fried Vermicelli

炒米粉这类一锅炒熟料理在这疫情期间差不多每周都在「婆妈」🏠上演着...煮到已经可以很善于随意搭配冰箱有的食材而变出看似有点小创意的炒米粉,自夸一下毕竟从未试过一直都在下厨了将近九个月以上啦,天使们也不停地夸奖,也许怕「婆妈」罢煮哈哈哈😂😅😂

干贝家常炒米粉 

{材料} 鸡蛋5粒(加一点酱油,胡椒粉和芝麻油打散备用),番茄米粉和普通米粉(分别川烫一分钟,沥干备用),干贝适量(洗净切片),小香肠(洗净切丝),萝卜丝,大葱丁,蒜碎和小红葱碎适量,生菜丝(洗净泡盐水15分钟,切丝备用)。 

{调味料}黑酱油1茶匙, 酱油2汤匙,蚝油1茶匙,鱼露1茶匙,番茄酱1茶匙,高汤 ½ 碗,芝麻油一茶匙,红糖 ½ 茶匙,盐和胡椒粉适量,混合搅拌均匀(亲子米粉用8-10茶匙左右)。 

***一口辣酱1汤匙和豆瓣酱1茶匙(只用在做法4)。 

{做法} 

1. 起油锅爆香小红葱碎,先把鸡蛋炒熟备用。 

2. 再起油锅爆香大葱,蒜碎和小红葱碎,加入香肠丝,干贝丝和萝卜丝拌炒一下后,调入8茶匙调味料和米粉翻炒均匀。(颜色不均再加入3茶匙调味料让米粉上色) 

3. 最后,加入鸡蛋拌炒一下即可出锅,享用是配上生菜丝增加视觉效果,吃着更有滋味。 

4. 接着,再起油锅炒大人的午晚餐份量。用猪油先炒一炒香肠丝,接着爆香大葱,蒜碎和小红葱碎,加入一汤匙一口辣酱和豆瓣酱炒香。 

5. 加入萝卜丝和干贝片翻炒均匀后,调入综合调味料和米粉继续翻炒均匀再加入鸡蛋拌炒均匀就搞定啦。 

Fried Vermicelli with Scallops 

{Ingredients} Eggs x 5 (beaten with some soy sauce, pepper and sesame oil), tomato vermicelli & normal vermicelli (blanch over hot boiling water for 1 min, drain well and set aside), some scallops (wash and sliced), cocktail sausages (wash and shredded), carrots (shredded), onions (diced), chopped garlic and shallots, lettuces (washed and soak in salter water for 15 mins, shredded), 

{Seasonings} Black soy sauce x 1 tsp, soy sauce x 2 tbsp, oyster sauce x 1 tsp, fish sauce x 1 tsp, tomato sauce x 1 tsp, broth x ½ cup, sesame oil x 1 tsp, brown sugar x ½ tsp, some salt and pepper, mix well (kid friendly recipe use 8-10 tsp of the mixture). 

***Crispy sambal chili x 1 tbsp and bean paste x 1 tsp (use at direction 4 only). 

{Directions} 

1. Heat up oil to saute some chopped shallots, pour in egg mixture to stir-fry till cooked and set aside. 

2. Heat up another round of oil to saute onions, garlics and shallots till fragrant, add in sausages, scallops and carrots to stir-fry a while, seasons in 8 tsp of seasonings mixture and vermicelli to continue stir-frying till well combined (add in another 3 tsp if not enough coated the vermicelli). 

3. Lastly, add in cooked eggs and mix them well, sprinkle up some shredded lettuces and enjoys. 

4. Then, heat up oil to cook adult’s portion for lunch + dinner. Use pork lard to saute the sausages 1st, follow by add in onions, garlics and shallots, add in crispy sambal chili and bean paste to stir-fry till fragrant again. 

5. Follow by add in carrots and scallops to stir-frying till mix well, add in seasonings mixture and vermicelli to stir-fry till well combine again only add in cooked eggs and mix them well, done and serve hot. 

Saturday, November 21, 2020

烤紫薯条 Oven Baked Purple Sweet Potato Fries

视频版的烤箱烤紫薯条,要脆一定要加粉裹,这样烤出来包你卡兹卡兹的👍😍😋切薄点会更容易酥脆但对孩子们不怎么健康,容易热气咯。重复做了几次,发现脆的软的,口感都是OK的,软的就像蒸番薯的feel咯。当下午茶或零嘴都是不错的选择哟😋🥰。

烤紫薯条 

{材料} 紫薯3粒(洗净去皮,切条状泡水洗净表面淀粉),盐适量(烤好才撒入,可不放。) 

{抹表面用} 玉米淀粉1汤匙,橄榄油3汤匙,混合均匀备用。 

{做法} 

1. 切好的紫薯条泡水一小时左右,沥干水份, 多余的水份一定要用厨房纸巾吸干。 

2. 烤盘铺上锡纸后抹上一层薄薄的橄榄油,把控干水份的薯条倒入纸袋中,再放入抹表面用的材料,抖动使每条薯条都沾上油酥,然后排好。(尽量不重叠!) 

3. 放入预热好的烤箱210°C中层,先烤15分钟;然后翻面再烤15分钟即可。 

4. 烤好,撒上适量的盐,待冷5分钟即可享用。 

Oven Baked Purple Sweet Potato Fries 

{Ingredients} 

Purple sweet potatoes x 3 (peel and cut into evenly-sized, soaked in water.), some salt. (will sprinkle on at the very end, optional.) 

{Glazing} Corn starch x 1 tbsp, olive oil x 3 tbsp, mix well and set aside. 

{Directions} 

1. Soak the well-cut sweet potato fries for at least 60 mins, rinse, drain and pat dry with kitchen paper towels. 

2. Baking tray cover with parchment sheet with a thin layer of olive oil or any other cooking oil,  transfer the fries into the bag, put in the glazing mixture, and toss evenly to ensure each fries coated with the oil, transfer to baking tray and arrange well. (Do not overlapping if possible!) 

3. Bake in pre-heated oven at 210°C for 15 mins first, flip the fries and bake for another 15mins. 

4. Remove baking tray from oven, season the fries with some salt (optional), and let it rest for 5 mins only enjoy it. 

Friday, November 20, 2020

超快手面包披萨 Easy Bread Pizza


没时间又想来点小心思的早餐或下午茶可以考虑一下这款快手面包pizza哦。配料随意,之前分享过一篇简易面包比萨的啦,为了加强我的视频编辑技术加上家里有的食材而做的CMCO早餐,一会儿大天使要上网课啦,如今很多「婆妈」们应该都和我一样多重身份,顾到这,顾不了那,每天一起身就停不了的节奏,但还是努力挤出一些时间熬一点夜做自己喜欢的事💜💪,看「婆妈」能坚持到何时,呵呵呵😂。

超快手面包比萨 

{材料} 面包5片,番茄酱,mozzarella芝士150克,菠菜(用加了点盐和油的沸水川烫一分钟,捞起沥干备用),甜椒丁,鸡肉碎(用一点胡椒粉,芝麻油和几滴酱油腌5分钟。),大葱碎和蒜碎少许。 

{做法} 

1. 起 ½ 汤匙橄榄油锅爆香大葱和蒜碎,加入甜椒丁拌炒均匀后加入鸡肉碎炒熟,盛起备用。 

2. 将面包片排好在以铺了烘焙纸的烤盘上,均匀的涂抹上番茄酱,撒上第一轮的mozzarella芝士,再把煮好的菠菜叶和炒好的鸡肉碎配料排满面包片,再加入满满的mozzarella芝士 (芝士的份量依个人口味)。 

3. 预热烤箱180°C, 烤大约12-15分钟左右或至芝士融化即可。(烤箱温度得自行拿捏哦!)
 
Easy Bread Pizza 

{Ingredients} Bread slices x 5, tomato sauce, shredded mozzarella cheese x 150g, baby spinach (blanch over boiling water that add with some salt and 2-3 drop of olive oil, drain and set aside.), diced bell pepper, minced chicken (marinade with some pepper, sesame oil and few drops of soy sauce.), some chopped onion and garlic. 

{Directions} 

1. Heat up ½ tbsp of olive oil to saute chopped onion and garlic, add in bell pepper to fry evenly only add in minced chicken to stir-fry till cooked, set aside. 

2. Arrange the bread slices on top of the baking tray that coated with baking paper, spread the tomato sauce evenly on top of bread slices, sprinkle up some mozzarella cheese, follow by add in the cooked spinach and minced chicken, then add on another layer of mozzarella cheese. (Cheese portions according to personal preference.) 

3. Preheat oven 180°C, baked for 12-15mins or until cheese fully melted. (Oven temperature adjust accordingly.) 

Wednesday, November 18, 2020

深呼吸 Take A Deep Breath


控制好生气的度 Control Your Anger

Challenge yourself to control your anger, before your anger dictates your life. Stay with anger in healthy level since it was a part of our life but don’t let it control you. Anger just took seconds, but always remember it can be calm down and let go. Anger is one letter short of Danger. Don’t punish yourself on others mistakes. Don't drain your energy and time on anger as we could using it for more meaningful things in life. 

不简单吖,虽然心中有数但还是三不五时会败给她们毫无保留的无理要求,家果然只能讲爱,讲理嘛,人家都不怎么听得入耳,更难记在心里。老师的一句好过「婆妈」的十句,可惜的是网课一天只有一小时😔😕😣控制好生气的度,就能拥有一切,中了生气的毒,严重时会一无所有。正确使用生气的人可以与自己的生气拥有一段健康或者“正常的”关系。生气是生活中正常的一部分,但别让生气支配着你的生活,受困于生气的人甚至完全无法接近自己所爱的人,因为总是怒气冲天的男女人们会令人望而却步。记得生气只是暂时的,它是可以被放下的。

Monday, November 16, 2020

桃胶雪燕皂角米银耳养颜糖水 Snow Bird Nest Peach Gum Snow Lotus Seed 6 in1 Collagen Dessert


桃胶雪燕皂角米银耳养颜糖水 Snow Bird Nest Peach Gum Snow Lotus Seed Collagen Dessert

3合一袋装的桃胶雪燕皂角米
桃胶袋装里头的养颜圣品分开泡过夜,再另加其它三种配料一次过让胶原蛋白饱满哦。
桃胶雪燕皂角米糖水 Snow Bird Nest Peach Gum Snow Lotus Seed Dessert

轻轻松松养出胶原蛋白美肌的亲民6 in 1养颜养生汤,近期虽然少了ME time但依然每星期都找时间炖一次,因为买了高品质植物胶质组合的袋装。难得可以让「婆妈」安心吃的商品可遇不可求叻,不过再好也不宜天天吃,男女人们,有条件的一周最多2次就好啦。Beauty starts from inside out, start it with natural collagen soup. A collagen booster dessert a week is a must.

桃胶雪燕皂角米银耳养颜糖水 

{材料} 桃胶/皂角米/雪燕独立包装1包(隔夜泡发,每样分开泡哦),银耳半朵(隔夜泡软,撕成片状),红枣3粒(洗净,去核切半),枸杞适量(洗净)。 

{调味料} 冰糖/红糖适量。 

{做法} 

1. 隔水炖法:先将银耳炖一个小时。 

2. 此时,简单的清理一下桃胶和雪燕的杂质(独立包装的好处就是省心省清理的时间)。 

3. 一小时后,再把桃胶,皂角米和红枣加入炖盅继续隔水炖20分钟后,再加入冰糖,雪燕和枸杞炖20-30分钟即可品尝。 

***桃胶/皂角米/雪燕/银耳,可以盖上保鲜膜放入冰箱隔夜泡发12-15小时。 

6 in 1 Collagen Dessert 

{Ingredients} Snow bird nest/ peach gum/ snow lotus seed x 1 sachet (soak individually for each item overnight), white fungus ½ pcs (soak overnight, tear to bite size pieces), red dates x 3 (rinse and deseed, cut into half), some goji berries (rinse well). 

{Seasonings} Some rock sugar/brown sugar. 

{Directions} 

1. Rice cooker double-boiled: place white fungus in stew pot, fill in water- half of the pot and cook under “slow cook” function for 1 hour. 

 2. Then, simple clean the peach gum and snow bird nest, remove impurities (sachet is super convenient as save lots of time). 

3. An hour later, add in peach gum, snow lotus seed and red dates inside the stew pot continue to slow cook for 20 mins only add in rock sugar, snow bird nest and goji berries to cook for another 20-30 mins. Serve hot/warm/chill, according to personal preferences. 

Sunday, November 15, 2020

鸡蛋煎面包 Easy French Toast
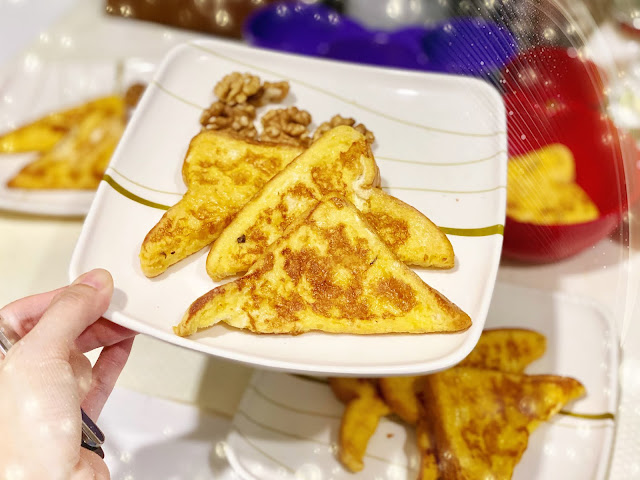
鸡蛋煎面包 Easy French Toast

沾鸡蛋液,双面煎成金黄色即可。

宅在家的早餐,这款鸡蛋煎面包一个月免不了要吃几次。高级一点就称为它为“法兰西吐司”或者西多士,它的配料可以有很多很多很多种,也可以抹上不同酱或搭配蔬菜水果,所以72变着吃都不会腻哦😋🥰😂。

鸡蛋煎面包 

{材料} 鸡蛋2粒,面包两片(切对半),牛油适量。 

{调味料} 牛奶2汤匙,糖 ½ 茶匙,盐一点,胡椒粉适量。 

{做法} 

1. 鸡蛋调入调味料打散备用。 

2. 不粘锅,抹上一层薄牛油,把沾了鸡蛋液的面包,双面煎成金黄色即可。 

3. 配料随意加,趁热享用。 

 Easy French Toast 

{Ingredients} Eggs x 2, bread slices x 2 (cut into half), some salted butter. 

{Seasonings} Milk x 2 tbsp, sugar x ½ tsp, a pinch of salt and some pepper. 

{Directions} 

1. Beaten the eggs with seasonings, set aside. 

2. Brush a thin layer of butter over the non-stick frying pan, dip the bread sliced in egg mixture, fry both sides of the slices until golden yellow. 

3. Side dishes according to personal preferences, serve hot. 

Saturday, November 14, 2020

双花炒蛋 Fried Broccoli and Cauliflower with Eggs

 鸡蛋创意料理继续收集ideas中,J说要「婆妈」教她煮全部关于鸡蛋的料理😂😅 

双花炒蛋 

{材料} 鸡蛋2粒(加一点酱油,胡椒粉和芝麻油打散备用),西兰花(洗净切块状),白菜花(洗净切块状),肉丝(用一点酱油和胡椒粉腌5分钟),萝卜丝,蒜碎和小红葱碎适量。 

{调味料}高汤5汤匙,盐和胡椒粉适量。 (可放鲍鱼汁1茶匙)

{做法} 

1. 西兰花和白菜花先用加了盐和橄榄油的沸水川烫2-3分钟,捞起沥干过冷水备用。 

2. 起油锅爆香小红葱碎,先把鸡蛋炒熟备用。 

3. 起油锅爆香蒜碎后,加入肉丝拌炒一下,接着加入萝卜丝继续拌炒。 

4. 然后,加入调味料拌炒至汤稍微煮沸,加入西兰花和白菜花翻炒。 

5. 接着,再加入鸡蛋炒至汤汁再次煮沸即可。 

Fried Broccoli and Cauliflower with Eggs 

{Ingredients} Eggs x 2 (beaten with ½ tsp soy sauce, pepper and sesame oil), broccoli (wash and cut into bit size), cauliflower (wash and cut into bite size), meat slices (marinate with some soy sauce and pepper for 5 mins), some shredded carrots, some chopped garlic and shallots. 

{Seasonings} Broth x 5 tbsp, some salt and pepper. (abalone sauce 1tsp, optional)

{Directions} 

1. Blanch over the broccoli and cauliflower with boiling water that add with some salt and olive oil for 2-3 mins, drain well, soak in cold water a while, drain well again, and set aside. 

2. Fry the egg mixture till cooked and set aside. 

3. Sautés chopped garlic and shallots till fragrant, add in meat slices to stir-fry a while, follow by add in carrots to continue stir-frying. 

4. Then, add in seasonings and bring to boil, add in broccoli and cauliflower to continue stir-frying. 

5. Follow by add in cooked eggs and bring to boil again, serve hot.

Friday, November 13, 2020

古早味红豆冰淇淋 Creamy Red Bean Ice Cream

CMCO进行中,家里感觉得到很“热”,火气🔥一天天变得越来越大,冰淇淋刚好可以降降温。家里没有鲜牛奶而变通的食谱,完成品不会很甜腻腻的,还不错👍。喜甜的,可能要在糖的份量上自行拿捏一下自家口味哈☺️。天使们吃过另一种“正常”的冰淇淋,会明示了...请「婆妈」下次做回那天那种冰淇淋吧😆😂。


红豆牛奶冰淇淋 

{材料} 红豆和清水适量(完全盖过红豆),牛奶500毫升(家里没鲜奶,用200毫升罐头淡奶+2汤匙的炼奶+煮红豆的水300毫升搅拌均匀),红糖30-40克,玉米淀粉25克(也可用糯米粉代替)。 

{做法} 

1. 红豆洗净,加入适量盖过红豆的清水, 放入高压锅煮熟即可备用。(或是红豆提前一晚洗净泡水,隔天加入适量盖过豆子的水煮到红豆熟,请煮到豆子开花哦。) 

2. 先把淡奶+炼奶+红豆水+红糖搅拌均匀后倒入锅中,加入玉米淀粉以小火慢煮,不停的搅拌至浓稠就可以了。
 
3. 然后,加入煮好的红豆搅拌混合均匀,倒入模具中,放入冰箱冷冻4-6小时或隔夜即可享用啦。

Red Bean Milk Ice Cream 

{Ingredients} Some red bean and water, milk x 500ml (replace with full cream evaporated milk x 200ml + condensed milk 2 tbsp + red bean water 300ml ; mix well) , brown sugar x 30-40g, corn starch x 25g (Can be replace by glutinous rice flour). 

{Directions} 

1. Wash read bean, add in the water to cover the bean, cook in pressure cooker till cooked. (Alternately please soaked red bean overnight, next day cook the red bean with right amount of water that just cover the bean till cooked.) 

2. Mix the evaporated milk + condensed milk + red bean water + brown sugar well before pour in a pot, follow by add in corn starch, stirring well and slow cook till thickening.

3. Then, add in cooked red bean and mix well, pour into the molds, freeze for 4-6 hours or overnight before enjoy it.

Thursday, November 12, 2020

Stay On Positive (This SOP is not that SOP)

Serenity Or Pandemonium

SOP, 当今社会样样都与SOP离不开关系...但是再怎么努力也变不出多余的时间和精力哟。之前真的真的真的很难去做到去尊重孩子们,也许我们自身的掌控欲强过度。时间慢慢地让我适应她们的节奏,虽然节奏变幻莫测😂。疫情期间,学会了更放宽心,允许孩子们在安全性考量的前提下不断地去探索来调节她们自己的人格。

说穿了,能够亲身体验看着一个人一天天“长成大人”果然不容易。所以说,能睁一眼闭一眼的就让孩子按照自己的节奏去成长吧。育儿这方面是没有标准的SOP,不然一肚子气的往往是父母。

Stay On Positive side since there are no SOP (Standard Operating Procedure) in parenting path. Each child has a different journey, be flexible to learn together with them.

Previous: 下一步是...What is Next?

Sunday, November 8, 2020

一口辣+番茄酱香肠花枝卷炒意面 Angel Hair Pasta with Crispy Sambal Chili + Tomato Sauce, Sausage and Squid

天使意面 (Angel Hair Pasta) 在「婆妈」家永远名列前茅,全家人最爱❤️是它啦...

一口辣+番茄酱香肠花枝卷炒意面 

{材料} 意面适量(用加了盐和橄榄油的沸水川烫至8分熟备用),香肠适量(切丝),鸡蛋3粒(加点酱油,胡椒粉和芝麻油打散备用),花枝卷,番茄块,萝卜丝,蘑菇块,白菜花和西兰花适量(用加了点盐和油的沸水川烫3分钟左右),洋葱丁,蒜碎适量,姜碎一点。 

{调味料} 一口辣酱2汤匙,意面番茄酱5汤匙,高汤 5汤匙,混合香料适量,盐和黑胡椒粉一点。 

{做法} 

1. 起油锅先把鸡蛋液炒熟备用。 

2. 起1汤匙无盐牛油和一汤匙橄榄油锅先把香肠丝小炒一下,才加入爆香蒜葱姜碎炒至香。 

3. 接着加入番茄块,蘑菇块和萝卜丝拌炒一下,调入一口辣和番茄酱,再加入花枝卷炒一炒。 

4. 倒入高汤,调入盐和黑胡椒粉继续拌炒一下后, 加入意面和混合香料翻炒至汤汁收干即可。 

5. 然后,加入鸡蛋翻炒均匀即可出锅。 6. 要享用时,记得加点水煮白菜花和西兰花哦。(也可以煎香肠适量加料哦) 

 Angel Hair Pasta with Crispy Sambal Chili + Tomato Sauce, Sausage and Squid 

{Ingredients} Some angel hair pasta (boiled cook with some salt and olive oil till almost cooked, drain and set aside), some sausages (shredded), eggs x 3 (beaten with some soy sauce, pepper and sesame oil), squid, diced tomatoes, shredded carrots, some diced mushrooms, some cauliflower and broccoli (boiled cook with some salt and olive oil for 3 mins, set aside), diced onions, chopped garlic and ginger. 

{Seasonings} Crispy sambal chili x 2 tbsp, pasta tomato sauce x 5 tbsp, broth x 5 tbsp, some mixed herb, some salt and black pepper to taste. 

{Directions} 

1. Fry the egg mixture till cooked and set aside. 

2. Heat up 1 tbsp of unsalted butter + 1 tbsp of olive oil to fry shredded sausages first only add in chopped garlic, onion and shallot to saute till fragrant. 

3. Follow by add in tomatoes, mushrooms and carrots to stir a while, season in sambal and tomato sauce, add in squid to stir-frying a while. 

4. Pour in broth, season with some black pepper and salt, add in cooked pasta and mixed herb, stirring till gravy is thickened. 

5. Then, add in cooked egg to continue stir-frying till well combined. 6. Remember to top up with some cooked cauliflower and broccoli before eat ya. (Can top up with some grill sausages too.)

Saturday, November 7, 2020

鲜番茄酱花枝炒意面 Angel hair pasta with fresh tomato sauce and squid

又点名要吃天使意面(Angel Hair Pasta)🍝啦,她们真的真的真的超爱这款意面...其实「婆妈」也超爱的,哈哈哈哈😂😋😍

鲜番茄花枝卷炒意面 

{材料} 意面适量(用加了盐和橄榄油的沸水川烫至8分熟备用),鸡蛋3粒(加点酱油,胡椒粉和芝麻油打散备用),花枝卷,番茄块,萝卜丝,蘑菇块,白菜花和西兰花适量(用加了点盐和油的沸水川烫3分钟左右),洋葱丁,蒜碎适量,姜碎一点。 

{调味料} 高汤 ½ 碗,盐一点。 

{做法} 

1. 起油锅先把鸡蛋液炒熟备用。 

2. 起1汤匙油锅爆香蒜葱姜碎,加入番茄块,萝卜丝和蘑菇块拌炒均匀,再加入花枝卷炒一炒。 

3. 倒入高汤和调入盐继续拌炒一下后, 加入意面翻炒至汤汁收干即可。 

4. 然后,加入鸡蛋翻炒均匀即可出锅。 

5. 要享用时,记得加点水煮白菜花和西兰花哦。 

 Angel Hair Pasta with Fresh Tomato and Squid 
{Ingredients} Some angel hair pasta (boiled cook with some salt and olive oil till almost cooked, drain and set aside), eggs x 3 (beaten with some soy sauce, pepper and sesame oil), squid, diced tomatoes, shredded carrots, some diced mushrooms, some cauliflower and broccoli (boiled cook with some salt and olive oil for 3 mins, set aside), diced onions, chopped garlic and ginger. 

{Seasonings} Broth x ½ cup, some salt to taste. 

{Directions} 

1. Fry the egg mixture till cooked and set aside. 

2. Heat up 1 tbsp of olive oil to saute chopped garlic, onion and shallot till fragrant, add in tomatoes, carrots and mushrooms to stir a while, follow by add in squid. 

3. Pour in broth and salt, add in cooked pasta, stirring till gravy is thickened. 

4. Then, add in cooked egg to continue stir-frying till well combined. 

5. Remember to top up with some cooked cauliflower and broccoli before eat ya. 

Friday, November 6, 2020

下一步是...What is Next?


心中有图,万事都足

男女人们,也许彻底地明白自己是天方夜谭,但能肯定的是我们都能掌握自己的❤️。心图让你走出稳稳地下一步,请管好你的心,让它为你做事而不是跟你作对。心若定下来,哪里都是天堂。Trying to control everything would be too much work and not enough life. But every men and women can control your heart, please rule your 💜 and let it work for you to reach your destination in 🗺 .

当你心中无图,一路上迷迷糊糊,到后来不知何去何从。如果你心中有图,但迟迟不行动,梦始终还是一场梦。每个男女人们都该有个弹性十足的「心图」,能承受得住任何局势的变化。有突发情况,你得变通,你的心图也得顺势而为做出合适的调整,这样的话,男女人们才能有个大有可为的人生。记住,心图的细节性不重要,重要的是你无论如何都要有个基本图在心中引导着你走出更省心更清晰的明天。Yes, we need a plan as a map to guide us for better tomorrow. Details of the plan is doesn't matter, as not all plans lead to the right path. But, we need a flexible plan to adapt to any changes. Follow the trend, sometimes is a better choice when you are floating without a clear direction.

简易快手鸡翅 Easy and Tasty Chicken Wings


「婆妈」秘制简易快手的烤箱料理 👉🏻烤鸡翅,天使们初尝这滋味,频频地说:“太好吃了!”🥰😂😍说真的,做了不计其数的烤鸡翅,这次的腌料太合我意,太OK的啦。Secret recipes需要不断努力地研究才能更佳, 记录一下后会继续加油的啦。😋💜😋❤️💪🏻💪🏻💪🏻

简易快手鸡翅 

{材料} 鸡中翅12只(洗净,在背面划两刀方便入味)。 

{腌料} 蒜碎2汤匙,小红葱碎1汤匙,姜碎1茶匙,酱油3汤匙,黑酱油1茶匙,蚝油 1汤匙, 芝麻油1茶匙, 绍兴酒1茶匙,五香粉 ½ 茶匙,红糖 1茶匙, 白胡椒粉和黑胡椒粉适量。 

{调味料} 蜜糖1汤匙。 

{做法} 

1. 鸡中翅用腌料腌至少1天。(腌2天会更入味哦) 

2. 将腌好的鸡翅排好在已铺了烘培纸上。 

3. 剩余的腌料加入蜂蜜拌均匀后,涂抹在鸡翅的正面与背面上。 

4. 放入预热烤箱180◦C烤15分钟左右。 

5. 烤好再涂上一层腌料,翻面将剩余的蜂蜜腌料涂抹在另一面,放入烤箱再烤13-15分钟或至颜色微焦即可。

Easy and Tasty Chicken Wings 

{Ingredients} Wings x 12 pcs (clean, lightly cut 2 lines inside the wings for better taste).x 1tsp, 

{Marinades} Chopped garlic x 2 tbsp, chopped shallots x 1 tbsp, chopped ginger x 1 tsp, light soy sauce x 3 tbsp, black soy sauce x 1 tsp, oyster sauce x 1 tbsp, sesame oil x 1 tsp, Shao xing wine x 1 tsp, five spice powder x ½ tsp, brown sugar x 1 tsp, some white and black pepper. 

{Seasoning} Honey x 1 tbsp. 

{Directions} 

1. Mix chicken wings with marinades sauce for at least a day. (2 days more tasty) 

2. Arrange wings on top of the baking tray that layered with baking paper. 

3. Mix leftover marinades sauce with honey, apply on both sides of wings. 

4. Bake in pre-heated oven at 180◦C for 15 mins. 

5. Brush another layer of honey marinades sauce, flip over and apply another layer of marinades sauce on top of each wings, continue bake for another 13-15 mins or until turn to dark brown or well cooked.

Sunday, November 1, 2020

极简自制斑兰冰淇淋 Quick and Easy Pandan Homemade Ice Cream

答应了天使们很久很久很久的事。自从做了几次被她们“嫌弃”但依旧会吃完的古早味冰淇淋,就会时不时向「婆妈」提一提什么时候做“正常”的冰淇淋🍦给她们试试😂。这食谱里的份量特地为天使们减少对糖的摄入而“量身定做”的,所以完成品会不怎么甜☺️。

极简自制斑兰冰淇淋 

{材料} 炼奶100克,鲜奶油400毫升,斑兰粉10克(个人喜好)。 

***打发鲜奶油的容器等预先放入冰箱冷藏。 

{做法} 

1. 炼奶加班兰粉拌均匀后冷藏备用。 

2. 鲜奶油低速开始打发1分钟后转去中速继续打发2分钟至出现纹路。 

3. 一次过加入冷藏的斑兰炼奶, 低速搅拌均匀至再次出现纹路轻轻翻拌均匀后,倒入模具。 

4. *速冻冷藏两-三小时后拿出来翻拌均匀再速冻冷藏,隔一小时再拿出来翻拌均匀(这步可省略滴---翻拌1-2次,口感细腻些。)

 5. 速冻冷藏至少要8小时左右才能享用,隔夜最佳。 

***炼奶150克,鲜奶油350毫升,班兰粉15克是「婆妈」🏠正常口味的份量哟!

Quick and Easy Homemade Pandan Ice Cream 

{Ingredients} Condensed milk 100g, whipping cream 400ml, pandan powder x 10g (optional). 

***Chilled mixing bowl and whisk attachment that use to whip up the cream.

{Directions} 

1. Mixed condensed milk and pandan powder well and keep refrigerated. 

2. Whip the cold whipping cream with mixer with low speed at first for 1 min and turn to medium speed to continue beat for another 2mins till form a soft peak. 

 3. Add in cold condensed milk mixtures, mix well with low speed a while till form firmer peak, and gently fold till well mixed, pour into mold. 

4. *Freeze for 2-3 hours and then take out to stir well and freeze again, after an hour stirring it well again and freeze it back (Stir for 1-2 times for smoother texture purpose, optional) . 

5. Freeze for at least 8 hours before enjoy it chill, or overnight is the best. 

***This is kid friendly recipe---Original flavour recipe: condensed milk 150g, whipping cream 350ml, pandan powder 15g. 

Featured Post

A MUST CNY cookies 🥜花生酱饼 Peanut Butter Cookies #cny2025

坚持每年都在做的年饼👉🏻花生酱饼 长视频里有材料和制作过程哦👇🏻 🍊花生酱饼 Peanut Butter Cookies https://youtu.be/KqZTC6KM2HU https://youtu.be/_vIQaziICjk 其它年饼👇🏻 🏮彩...